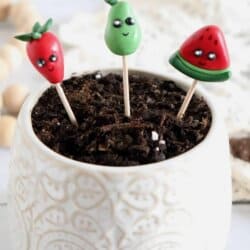
DIY Clay Fruit Garden Markers
These DIY clay fruit garden markers are fun to make and perfect for identifying seeds that you have planted in the garden this spring.
Materials
- parchment paper
- baking sheet
- polymer clay in green dark green, orange, red, yellow, purple, blue and black
- clay cutting and shaping tools
- toothpicks
- black sharpie fine tip marker
- white glue
- white paint
- mod podge
- paint brush
Instructions
- 1. Begin by forming the clay into malleable balls.
- 2. For the cherries: form two 1 cm red balls. Form two 1/2 cm green balls into ropes and ¼ cm green ball into a leaf shape.
- 5. Form the white ball into a flat half circle. Wrap the dark green rope around the white half circle, place the light green “u” around this, finish by pressing the brown rope around that. Trim off any excess clay to make the top flat.
- 8. Attach the triangles to the top of the berry. Form two indents for eyes with the stylus.
- 11. Form two indents for eyes with the stylus.
- 13. Form two indents for eyes into the pear with the stylus.
- 14. For the strawberry: form a 2cm red ball into a cone shape, form four ½ cm green balls into teardrop, leaf shapes. Attach the green leaves to the top of the berry.
- 15. Form two indents for eyes with the stylus.
- 16. For the orange: form a 2cm orange ball into a circle shape. Lightly add dots with a clay tool. Form one ¼ cm green ball into a leaf shape, attach to the top.
- 17. Form two indents for eyes with the stylus.
- 18. For the watermelon: form a 2 cm red ball into a triangle shape. Form 1/2 cm dark green ball and light green ball into ropes. Press them to the bottom of the triangle.
- 19. Form two indents for eyes with the stylus.
- 20. For the lemon: form a 2cm yellow ball into a cylinder shape tapered at the ends. Form a ½ cm green ball into a leaf shape and attach to the top.
- 21. Form two indents for eyes with the stylus.
- 22. Roll at least 20 tiny black balls for eyes.
- 23. Bake as directed on the package. This is usually 20 minutes at 220 degrees.
- 24. Once the clay has cooled, glue the black balls onto the fruit for eyes.
- 25. Draw mouths onto the fruit with a black sharpie, add seed details to the watermelon and the kiwi. Add white dots to the eyes with paint.
- 26. Cover with mod podge to seal.
- 27. Finally, insert a toothpick into each fruit to use as a garden marker.