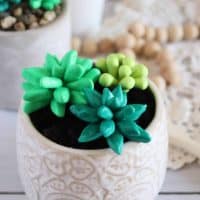
DIY Polymer Clay Succulent Plants
These DIY clay succulent plants are super easy to make and create the cutest planters you've ever seen! Follow this step by step visual tutorial to make your own...
Yield: 1
Materials
- parchment paper
- baking sheet
- polymer clay in blue green dark green and light green
- clay cutting and shaping tools
- toothpicks
- mod podge
- paint brush
- plant pot
- potting soil or small rocks
Instructions
- 1. Begin by forming the clay into a soft, malleable ball
- 2. Roll 1 cm clay balls in each of the three green colors.
- 4. Cones, leaves and tear drops.
- 7. Finish with 3 more leaves and plant one is complete.
- 8. Flatten a ball into a flat disk and press the end of the cone shapes around the edge of the disk
- 9. Bring the cones up to the center and press together to form another plant.
- 10. Press four of the tear drops together at the rounded base.
- 11. Layer the tear drops alternatingly to create another plant.
- 13. Poke a hole in the underside of each clay plant for a toothpick.
- 14. Bake the clay as directed in the oven. For me that was 25 minutes at 200 degrees.
- 15. Once the clay has cooled, seal with mod podge.
- 16. Using a toothpick, place each plant into the soil or rocks of the plant pot.