DIY Christmas Tree Collar
How to make a DIY Christmas tree collar using a thrifted basket.
Yield: 1
Cost: $5
Materials
- Wicker basket
- Sturdy scissors or exacto knife
- Tape optional
Instructions
- 1. To create this woven tree collar I first started by scouring my local thrift stores for a wicker basket that I felt would be the right shape and size. This basket that I ended up finding and using is approx. 12"x12"x14" and was only $4.99.
- 2. Cut out the bottom of the basket to create a ring. Depending on how large the basket is in circumference, you may need to also cut it open along a side seam.
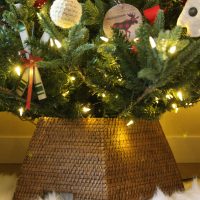
- 3. Finally, place the basket (now tree collar) upside down and around the Christmas tree stand. I simply wrapped it around the stand, leaving the cut opening of the basket at the back. Add christmas tree ornaments and a tree skirt to finish the look and you are all set!
Video
Notes
It is important to know how much room you have to work with at the base of your tree. Some Christmas trees have branches that are higher from the floor while others have branches that are lower.
Be sure to measure the height of your tree stand before going shopping for a wicker basket. Look for ones with a "seam" as you will likely need to cut the basket to fit it around the christmas tree base.
Cutting along the seam helps to prevent fraying and damage to the woven material. Tape can be used to reinforce cut edges.
My basket was not quite large enough to fit around the tree stand so using sharp kitchen shears I cut it open along a side seam as well. This allowed me to spread the basket wider and create the woven tree collar look that I was hoping for.