Go Back Email Link
clay vegetable plant markers
Print
No ratings yet

DIY Clay Vegetable Garden Markers

These DIY clay vegetable garden markers are fun to make and perfect for identifying seeds that you have planted in the garden this spring.
Active Time30 minutes
Additional Time20 minutes
Total Time50 minutes
Author: Heather Painchaud

Materials

  • parchment paper
  • baking sheet
  • polymer clay in green dark green, orange, red, yellow and black
  • clay cutting and shaping tools
  • toothpicks
  • black sharpie fine tip marker
  • white glue
  • white paint
  • mod podge
  • paint brush

Instructions

  • 1. Begin by forming the clay into a soft, malleable ball.
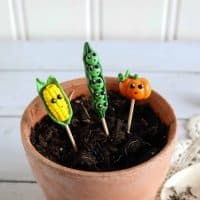
  • 2. For the corn: form a 2 cm yellow ball into a cylinder shape and form a ½ cm yellow ball into a thin rope.  
  • 3. Form two 1 cm green balls.  Shape the balls into teardrops about 3 cm long. 
  • 4. Wrap the yellow rope around the yellow cylinder.  Score with a clay tool to make kernels.
  • 5. Press the green leaves to wrap around half of the yellow corn. Form two indents for eyes with the stylus. Pierce a hole in the bottom with a toothpick.
  • 6. For the peas: form a 1 1/2 cm dark green ball and press it into a teardrop shape about 5cm long.  Form 5 – ½ cm green balls.  
  • 7. Place the balls in a line and wrap the dark green leaf behind them to form a pod. 
  • 8. Form two indents for eyes into each of the peas with the stylus.  Pierce a hole in the bottom with a toothpick.
  • 9. For the broccoli: form a 2 cm green ball into a cylinder shape, form ten ½-1 cm dark green balls. 
  • 10. Press the dark green balls to the top of lighter green cylinder. 
  • 11. Form two indents for eyes with the stylus.  Pierce a hole in the bottom with a toothpick.
  • 12. For the pepper: form a 1 ½ cm dark green ball into a cylinder shape about 1 ½ cm long and score lines with a clay tool.  Form ¼ cm dark green ball and attach it to the top as a stem.  Form two indents for eyes with the stylus.  Pierce a hole in the bottom with a toothpick.
  • 13. For the carrot: form a 2 cm orange ball into a cone shape and form three 1/4 cm green balls into teardrop shapes.  Attach the green leaves to the top of the carrot.  Form two indents for eyes with the stylus.  Pierce a hole in the bottom with a toothpick.
  • 14.  For the pumpkin: form a 2 cm orange ball into a circle shape and press it slightly to squash the shape to look like a pumpkin.  Score lines with a clay tool. Form two ¼ cm green balls.  Roll one into a green rope.  
  • 15. Loop the rope into a gentle coil and attach it to the top of the orange pumpkin.  Place second green ball on top for a stem.  Form two indents for eyes with the stylus.  Pierce a hole in the bottom with a toothpick.
  • 16. For the hot pepper: form a 1 ½ cm red ball into a cylinder shape about 2 cm long.  Form ¼ cm dark green ball and attach it to the top for a stem.  Form two indents for eyes with the stylus.  Pierce a hole in the bottom with a toothpick
  • 17. For the tomato: form a 1 ½ cm red ball into a circle shape.  Form a ¼ cm dark green ball into a tear drop shape.
  • 18. Attach the green leaf to the top of the tomato.  Form two indents for eyes with the stylus and pierce a hole in the bottom with a toothpick.
  • 19. For the cucumber: form a 2 cm dark green ball into a long cylinder shape about 4 cm long.  Form two indents for eyes with the stylus.  Pierce a hole in the bottom with a toothpick.
  • 20. Form 26 tiny black balls for eyes.  Tip: make more of these than needed as they can get lost or be the wrong size.
  • 21. Place the clay vegetables on a parchment lined baking sheet and bake as directed on the package.  For me this was 20 minutes at 220 degrees.
  • 22. Once cooled draw a smile on each vegetable with a sharpie.
  • 23. Glue the tiny black balls into each indent for eyes on each of the vegetables.
  • 24.  Paint a white dot onto each eye to create a pupil.  Tip: using a toothpick to paint dots on the eyes makes it easy!
  • 25. Coat each vegetable with mod podge.
  • 26. Finally, insert a toothpick into each vegetable to use as a garden marker.

Video