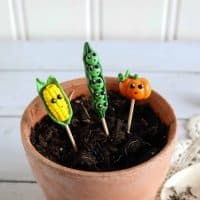
DIY Clay Vegetable Garden Markers
These DIY clay vegetable garden markers are fun to make and perfect for identifying seeds that you have planted in the garden this spring.
Materials
- parchment paper
- baking sheet
- polymer clay in green dark green, orange, red, yellow and black
- clay cutting and shaping tools
- toothpicks
- black sharpie fine tip marker
- white glue
- white paint
- mod podge
- paint brush
Instructions
- 1. Begin by forming the clay into a soft, malleable ball.
- 2. For the corn: form a 2 cm yellow ball into a cylinder shape and form a ½ cm yellow ball into a thin rope.
- 3. Form two 1 cm green balls. Shape the balls into teardrops about 3 cm long.
- 4. Wrap the yellow rope around the yellow cylinder. Score with a clay tool to make kernels.
- 5. Press the green leaves to wrap around half of the yellow corn. Form two indents for eyes with the stylus. Pierce a hole in the bottom with a toothpick.
- 6. For the peas: form a 1 1/2 cm dark green ball and press it into a teardrop shape about 5cm long. Form 5 – ½ cm green balls.
- 7. Place the balls in a line and wrap the dark green leaf behind them to form a pod.
- 8. Form two indents for eyes into each of the peas with the stylus. Pierce a hole in the bottom with a toothpick.
- 9. For the broccoli: form a 2 cm green ball into a cylinder shape, form ten ½-1 cm dark green balls.
- 10. Press the dark green balls to the top of lighter green cylinder.
- 11. Form two indents for eyes with the stylus. Pierce a hole in the bottom with a toothpick.
- 12. For the pepper: form a 1 ½ cm dark green ball into a cylinder shape about 1 ½ cm long and score lines with a clay tool. Form ¼ cm dark green ball and attach it to the top as a stem. Form two indents for eyes with the stylus. Pierce a hole in the bottom with a toothpick.
- 13. For the carrot: form a 2 cm orange ball into a cone shape and form three 1/4 cm green balls into teardrop shapes. Attach the green leaves to the top of the carrot. Form two indents for eyes with the stylus. Pierce a hole in the bottom with a toothpick.
- 14. For the pumpkin: form a 2 cm orange ball into a circle shape and press it slightly to squash the shape to look like a pumpkin. Score lines with a clay tool. Form two ¼ cm green balls. Roll one into a green rope.
- 15. Loop the rope into a gentle coil and attach it to the top of the orange pumpkin. Place second green ball on top for a stem. Form two indents for eyes with the stylus. Pierce a hole in the bottom with a toothpick.
- 16. For the hot pepper: form a 1 ½ cm red ball into a cylinder shape about 2 cm long. Form ¼ cm dark green ball and attach it to the top for a stem. Form two indents for eyes with the stylus. Pierce a hole in the bottom with a toothpick
- 17. For the tomato: form a 1 ½ cm red ball into a circle shape. Form a ¼ cm dark green ball into a tear drop shape.
- 18. Attach the green leaf to the top of the tomato. Form two indents for eyes with the stylus and pierce a hole in the bottom with a toothpick.
- 19. For the cucumber: form a 2 cm dark green ball into a long cylinder shape about 4 cm long. Form two indents for eyes with the stylus. Pierce a hole in the bottom with a toothpick.
- 20. Form 26 tiny black balls for eyes. Tip: make more of these than needed as they can get lost or be the wrong size.
- 21. Place the clay vegetables on a parchment lined baking sheet and bake as directed on the package. For me this was 20 minutes at 220 degrees.
- 22. Once cooled draw a smile on each vegetable with a sharpie.
- 23. Glue the tiny black balls into each indent for eyes on each of the vegetables.
- 24. Paint a white dot onto each eye to create a pupil. Tip: using a toothpick to paint dots on the eyes makes it easy!
- 25. Coat each vegetable with mod podge.
- 26. Finally, insert a toothpick into each vegetable to use as a garden marker.
Video
[adthrive-in-post-video-player video-id="4gsiNxco" upload-date="2021-03-19T00:00:00.000Z" name="Clay Vegetable Garden Markers" description="These DIY clay vegetable garden markers are fun to make and perfect for identifying seeds that you have planted in the garden this spring."]
