Polymer Clay Snowflake Ornament
These Polymer Clay Wood Slice Snowflake Ornaments are absolutely darling. Let me show you how to make these polymer clay ornaments in a matter of minutes!
Yield: 6
Cost: $2
Materials
- White polymer clay
- 2 " rustic wood rounds
- Acrylic paint or stain optional
- Hot glue gun
- Bakers twine
- Cookie sheet & oven
Instructions
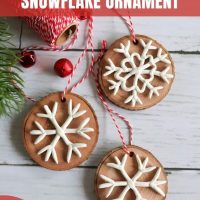
- 1. Roll a pea sized ball of white clay into a 1.5" length. Repeat three times. Roll twelve small pieces into tiny balls and shape into 1/4" lengths.
- 2. Overlap the longer white pieces of clay in the center of each length, creating a cross shape. Then place the twelve smaller pieces at the end of each branch, creating a snowflake. Tip: be sure to press down firmly so that the clay adheres to itself.
- 3. Place the snowflakes on a baking sheet lined with a piece of parchment paper and bake in the oven at 275 degrees for 15 minutes per 1/4" of thickness of clay.
- 4. Paint or stain the wooden rounds if desired. Drill a small hole at the top of each one. We liked both the natural and stained look!
- 5. Use a hot glue gun to affix the snowflakes to the wood rounds. Finally, tie with a length of bakers twine for hanging.
Video
Notes
Details step by step photos at homemadeheather.com