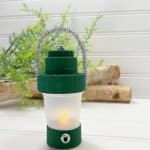
Camping Lantern Craft
Create your own camping lantern with this fun craft! Customize it with colorful paper, LED lights, and a handle for easy carrying. Illuminate your camping adventures!
Yield: 1
Cost: $5
Materials
- Votive Battery Operated
- Tinsel Chenille Stem Silver
- Pony Beads Silver
- Acrylic Craft Paint – green
- Paintbrush
- Glue Gun and Glue Sticks
- Scissors
- Craft Knife
- Recycled – Mini Medicine Cup Large Plastic Lid, Medium Plastic Lid, Small Plastic Lid
Instructions
- 1.Gather all supplies. Using the plastic medicine cup from liquid cold medicine, match a large recycled lid to the top of the cup. Mine is from a vitamin bottle. The medium lid is from a bottle of liquid cold medicine, and the small recycled lid is from a water bottle.
- 2. Center the bottom of the plastic medicine cup on the battery-operated votive flame and push gently to create an indent. Flip the plastic medicine cup upside down and carefully cut an “X” in the center with a craft knife.
- 3. Cut the triangular flaps of the “X” away with a craft knife to create an open square.
- 4. Carefully insert the plastic flame of the votive through the hole. This will become the base of the lantern.
- 5. Stack the three recycled lids on top of each other from largest on the bottom to smallest on the top. Secure the lids together with a glue gun and glue sticks. This will become the top of the lantern.
- 6. Basecoat the outside edge of the votive and the recycled lids with dark green or red acrylic craft paint. Let dry, and apply a second coat, if necessary. In my case, three coats were necessary to create a solid color on the exterior of the lantern.
- 7. Attach the lantern top to the lantern base with a glue gun and hot glue.
- 8. Cut a silver tinsel chenille stem, or pipe cleaner, in half with scissors. Remove two silver pony beads from their package.
9. Slightly bend the half chenille stem in a curve. Use a glue gun to attach it to the top right and left sides of the lantern. - 10. To finish, glue one silver pony bead to the top of the lantern, and the other to the front center of the base of the lantern.