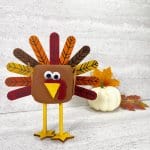
Thanksgiving Turkey Craft
Create a budget-friendly Thanksgiving masterpiece with this Dollar Store Turkey Craft using a free printable template. Affordable and fun for all!
Yield: 1
Cost: $10
Materials
- Foam Dice – Dollar Store
- Jumbo Craft Sticks – Dollar Store
- Wiggle Eyes – Dollar Store
- Wooden Dowels 6” – Dollar Store
- Wooden Stars – Dollar Store
- Craft Felt or Craft Foam – Brown Burgundy, Gold
- Craft Paint – Medium Brown Dark Brown, Burgundy, Yellow, Gold, Bright Orange, Dark Orange
- Glue Gun and Glue Sticks – Dollar Store
- Strong Adhesive like E6000
- Paintbrush
- Scissors
- Ruler
- Pencil
- Permanent Marker Black
Instructions
- 1. Gather all supplies. Remove the foam dice from the packaging. For the turkey's body, first apply a base coat of medium brown acrylic craft paint to the foam dice. Let paint dry and apply a second coat, if necessary.
- 2. Base coat the front, back, and sides of jumbo craft sticks with acrylic craft paint as follows: burgundy (2), yellow (1), gold (1), bright orange (1), dark orange (1), and dark brown (1). Let paint dry and apply a second coat, if necessary. These will become the turkey feathers.
- 3. Measure and cut each jumbo craft stick in half with scissors.
- 4. Add feather markings to each half craft stick using a permanent black marker. Drawn a line down the center and then diagonal lines drawn into the center line.
- 5. Lay out the half jumbo craft sticks with the burgundy in the center and on the ends. Then dry fit the rest of the feathers in between. Refer to the photo for placement. Attach the half jumbo craft sticks to the back of the turkey with a glue gun and glue sticks. You could also use liquid craft glue, but it will take longer to dry.
- 6. Using the free printable template, download, print, and cut out the foam dice turkey patterns. With a black marker, trace the turkey beak onto gold craft felt and the turkey waddle onto burgundy craft felt. Cut out the beak and waddle with scissors. Add a face to the turkey by attaching two googly eyes with a glue gun and glue sticks. Glue the felt waddle and beak directly under the wiggle eyes.
7. Base coat one 6” wooden dowel and two wooden stars with gold acrylic craft paint. Let dry and apply a second coat, if necessary. - Then cut the wooden dowel in half. Attach the flat end of each dowel half to the center of each star with a strong adhesive, like E6000. Let glue set according to package directions.
- 8. Push the pencil point into the bottom of the foam dice twice. Add a small amount of glue to the end of the wooden dowel and insert into the hole created with the pencil. Repeat for the second leg.
- 9. Stand the turkey up and adjust the legs before the glue dries.
- 10. Trace the turkey wing pattern onto brown craft felt twice with a marker. Cut out the turkey wings with scissors. You could also use craft foam, colored card stock, or construction paper for this project.
- 11. To finish, attach a wing to the right and left hand side of the turkey, using a glue gun and glue sticks.
