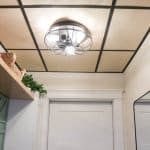
How to Create a Wood Drop Ceiling
Transform your space with a stunning wood drop ceiling. Follow this step-by-step tutorial to create a stylish and functional masterpiece.
Yield: 1
Materials
- Table Saw
- Tin Snips
- Screw Driver
- Screws
- Stud Finder
- Metal L Shaped Outer Bracket
- Metal T Main Support Bracket
- Metal Cross T Support Bracket
- 1/4 " Plywood - we used birch
- Black Paint
Instructions
- 1. Measure the ceiling space. Purchase enough “L shaped” outer track for the perimeter of the room. Purchase “T main” supports for the length of the room. The “T main” supports are needed for every two feet across. Purchase “cross T” supports for the width of the room, again spacing every two feet.
- 2. Purchase 1/4” birch plywood. This is cut to 23 3/4” squares. Measure and cut to width as needed around the room.
- 3. Paint the supports and brackets black with spray paint. Give them two even coats and allow to dry.
- 4. Put up the L shaped outer track around the outer edge of the ceiling. Measure the distance from the floor and mark lines around the room at the same height (standard is 8FT). Use a level to make sure the marks are level. Screw them into the wall, preferably into studs.
- 5. Cut the t main to length using tin snips. Cut the backbone first and then each side of the t.
- 6. Place the t main onto the L supports, being sure to measure that everything is centered the way you want it.
- 7. Instal cross ts between the mains and the L supports. You may need to cut these to length depending on your room size.
- 8. Cut the plywood to size for each section within the supports. The t shaped supports allow for the plywood panel to rest within them.
- 9. Place the plywood within the supports. Angle the plywood into the open space and allow it to drop into the supports.
Notes
Tip: On the main t there are notches every 6”, be sure to have them equally spaced from the wall so that your ceiling tiles are then equally spaced.
Tip: If your room is longer than a t main, you’ll need to use wire to hang it from the joists for added support.
Tip: We started by centering a tile in the middle of our ceiling and worked out from there.