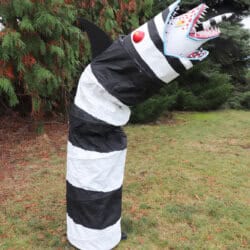
Beetlejuice Sandworm Costume DIY
Create a show stopping Beetlejuice Sandworm costume with bold stripes, creepy teeth, and spooky details. This is a creative DIY project that's perfect for Halloween!
Yield: 1
Cost: 50
Materials
- Large round laundry hamper with handles about 16-18"
- Medium tapered plant pot, about 10-12"
- 14-16 " wreath form
- Sheet of foam poster board x 2
- Wire clothing hanger x 2
- Masking tape
- Brown craft paper
- White glue
- Brick of floral foam
- Scissors
- Air dry clay
- 3 " Styrofoam ball
- Acrylic paint
- Paintbrush
- Glossy mod podge
- Two PVC poles about 12" in length
- Hot glue gun
- Hot glue - lots!
- Play tunnel
Instructions
- Gather all of the supplies. Be sure to have lots of masking tape and hot glue - this project uses a lot!
- Cut mouth shapes out of the laundry basket and plant pot. Cut a hole in the bottom of the laundry basket about 8" round. Use caution when cutting the plastic. I used heavy duty kitchen shears.
- Cut the wire hanger to form curves to elongate the lips of each mask. Hot glue these into place and then support and cover with poster board cut into a similar shape.
- Wrap each mask in poster board (if needed - I only wrapped the laundry basket) and use masking tape to fasten it all together. Press the wreath form into the center of the laundry basket to add a support that the smaller mouth will rest on. Use hot glue and/or masking tape to fasten it inside.
- Use the air dry clay to add lip and eye details to each mask. Cut the styrofoam ball in half and glue each half to the larger mask to form eyes.
- Create two sets of teeth, smaller 1" teeth (about 30) and larger 2" teeth (about 25) using the air dry clay. Allow the clay to dry overnight.
- Cover the masks in a layer of craft paper using a decoupage method of mixing 1 part white glue and 1 part water to create a watery paste. Tear the craft paper (newspaper works too!) into 1-2" pieces and layer it over the masks with the glue mixture. Use the floral foam to shape a 8-10" tongue and cover it in craft paper as well.
- Using acrylic paint, paint both the masks, teeth and tongue. Try not to paint the base of the teeth as the glue will adhere better without paint.
- Cut a fin shape from the poster board and a rectangle shape. Glue the fin to the rectangle and paint it black.
- Paint the play tunnel with black and white stripes.
- Finishing Details
- Cut a slit in the top of the tunnel, place the fin in it and then use hot glue to fasten the fin in place. At this time you can try the tunnel on and cut an eye hole in the tunnel, opposite to the fin.
- Fasten the two PVC pipes into the laundry basket on the inside, equal distance apart through the holes with hot glue - these become handles to use while wearing the mask.
- Glue the smaller mouth into the center of the larger mouth. I used hot glue and later reinforced it on the inside with spray foam.
- Now glue all of the teeth and tongue to the mask. The large teeth go on the larger mask and smaller teeth on the smaller one.
- Tip: use LOTS of hot glue on each tooth! We learned our lesson after making this Functioning Demogorgon Mask - tons of glue is key to having the teeth stay on.
- Finally, use glossy mod podge on the tongue, mouth, teeth and eyes to give them a shiny finish.
- To assemble the sandworm costume you'll need a helper. Carefully step into the tunnel, hold the mask through the base and pull the tunnel up over the base of the mask.