DIY Demogorgon Stranger Things Mask Tutorial
Check out this Stranger Things Demogorgon Mask you guys!
This (absolutely EPIC) Demogorgon Mask was surprisingly easy to make using items found inexpensively at the dollar store. Today I am sharing the step-by-step tutorial so that you can create a Demogorgon Mask of your own..
We are huge fans of the Netflix series, Stranger Things. My boys are obsessed with the characters and I love it. The show reminds me of my childhood with a Goonies / Stand By Me vibe. Its super fun to share in the old school shenanigans and binge this series with my kids. So this year when they requested Stranger Things costumes, it came as no surprise.
We even made this awesome FUNCTIONING Demogorgon Mask DIY! AND the cutest Demodog Costume too.It’s pretty gruesome looking hey? The Demogorgon is a monster that comes from another dimension, the Upside Down, to terrorize the characters in Stranger Things. My kids will probably correct me, but I think that it transforms and grows from a little slug-like thing? I’m not sure exactly what it DOES to you if it catches you but lets just use our imagination, shall we?!
I friggin’ love how this Stranger Things Demogorgon mask turned out! It’s sure to be a hit this Halloween with all of the kids. Let me show you how to create your own…
Supplies:
(aff links)
Masking tape
Hot glue sticks
Hot glue gun
Acrylic paint (various colours)
Paint brush
Mod podge (glossy)
Scissors
How to make this Demogorgon Mask:
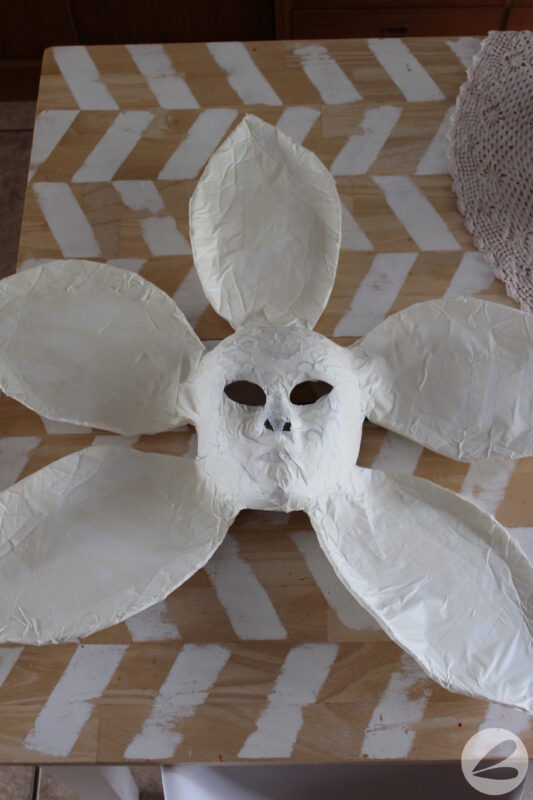
- Cut the poster board into five flower petal shapes 10″ x 12″. Gently bend the petals to give them added shape.
2. Fold the tip of each petal and hot glue to the inside of the mask.
3. Use leftover poster board, cut into teardrop shapes 6″x4″, to add dimension to the back of each petal. Use masking tape to adhere to the petal.
4. Repeat all around the mask.
5. Cover each petal completely in masking tape.
6. Wrap the entire mask in masking tape. Tip: gently hold and fold each petal while wrapping with tape to give added shape. The masking tape acts as a paper mache type of material without the weight and dry time.
7. Using clay, form hundreds of teeth 1/2″ – 1″ long. We rolled at least three baking sheets full of teeth.
8. Allow the teeth to dry then paint each of them cream colour. We used a combination of white, yellow and brown.
9. Paint the back of the mask and edges grey. We used a combination of black, white, brown and green. A sponge paint brush helped to give a mottled effect.
10. Paint the front of the mask. Be sure to give the face a recessed look with darker paint. We used a combination of black, red, white and brown paint with a sponge paint brush. Coat with a thick layer of mod podge to seal the entire mask and give the monster a shiny, moist look.
11. Finally, hot glue gun teeth to the mask. Tip: use LOTS of glue! This will prevent the teeth from falling off and also give the mask a slimy look like the inside of a monsters mouth. Leave the hot glue strings, they look like saliva!
We layered shorter teeth around the edges and longer teeth down the center of each petal.
Smaller teeth were used to highlight the Demogorgon’s receding mouth and throat.
More mod podge can be added to the entire mask to give the teeth added strength and a glossy appearance.
Hot glue strings are perfect for the drippy look of saliva.
The finished Demogorgon Mask:
This Stranger Things Demogorgon Mask is sure to be a show stopper this season! I can’t wait to see everyone’s reaction this Halloween. We also made this Functioning Demogorgon Mask if you want to make a version of this that moves!
One of the hazards of being a creative blogger is that your kids start to think that you can create ANYTHING. While Cam was thrilled with this mask, he was also certain that I could make him one that MOVED. A Demogorgon Mask with an opening and closing mouth. This momma was completely skeptical that something like that could be achieved. But with the help of friends and one very determined eleven year old, we made it happen! So stay tuned for the DIY Stranger Things Functioning Demogorgon Mask… coming very soon! Now you can see the functioning Demogorgon Mask in action.
Looking for more Halloween Costume ideas? Check out a few of our favorites…
Plants vs Zombies Cone Head Zombie


Thanks for the inspiration. I made this for a youngster, and used soft craft foam sheets in place of the stiff foam- core. Much lighter and easier for them to wear. Using a meg red color we only needed to add some darker tones for shading.
Great tip! Thanks for sharing <3
excellent tutuorial. thanks to your instructions i was able to create a great-looking demogorgon mask. i was able to find white, air-dry clay, so i was able to save a few steps, but i did make way more teeth than i needed, so now i have a drawer full of teeth!
also, i’m a complete mess when it comes to using a glue gun, so instead i put some e6000 adhesive in a bowl, let it get a little hard, and then i dipped each tooth into the glue and stuck it onto the leaves that way. finally, i went to the Dollar store, bought some black stockings, and used a portion of them to cover the eyes and mouth (just for the school party – i’ll remove them when we go trick or treating, of course!).
thank you so much for sharing this! i couldn’t have done this without you!
That is so awesome to hear!! We would love to see a photo of your finished demogorgon!!