Fabric Maze Tutorial

Follow this fabric maze tutorial to make the perfect DIY marble game for your toddler. The printable maze pattern makes it easy!
I saw a simple fabric maze on Pinterest, HERE, and I thought it looked like fun! I wanted to make a larger more complicated maze, to keep my busy boy well… BUSY. This is a fairly simple project that uses up some of your scraps, and costs PENNIES to make!
My name is Carlee, I blog at Ladybird Ln, I like to blog about simple recipes, crafts, home design, and life in general! I have two sassy girls, and one little buckaroo! My little man often feels left out because he is the only boy in our family, so I was excited for the challenge of making something for the boys! Thank you Heather, for allowing me to guest post today!

This post contains affiliate links.
Items Needed
- Fabric Scraps for maze, add 3/4 inch to the long and short size of your maze. For my printable, I cut out 2- 7 1/4″ and 10 1/4″ rectangles as well as 2- 2″ squares.
- Contrasting thread, you do not want the thread to match the fabric.
- Decorative glass stone (or find a bag full of marbles at the dollar store)
- Printed Maze
- Ribbon, cut 5″ length
Fabric maze tutorial
1. Prepare the materials.

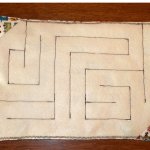
2. Print and cut out maze, and measure the length and width of the maze itself. This maze should be about 6 1/2″ by 9 1/2″ after printing.

3. Cut two rectangular pieces of fabric 3/4″ longer then the long and short side of the maze. It works out nicely if you do one solid colored fabric for the front, and a fun patterned for the back… (I learned that after I took these pictures)!

4. In addition cut two, two inch fabric squares for the corner piece. Fold the square down the diagonal of the square to make a triange, if using felt just cut the square in half, because you do not need a finished edge.

5. On the right side of the front fabric, sew fabric triangles to opposite corners, (this will denote the start and finish of the maze). Look at the maze and make sure you put them in the right corners. Fold the ribbon in half and tack it to the edge of the fabric. Your pieces should now look like the picture above.

6. With a 1/4″ seam allowance, and right sides together, sew around the perimeter of the front and back pieces, leaving a small opening.

7. Turn right side out, and press.

8. Pin the maze directly onto the front of the fabric.

You’re almost done!
9. Sew on the paper (it will be ok), directly on the lines of the maze. MAKE SURE YOU BACK STITCH, at every corner, and at the end of every line. It is best if you use a contrasting thread, so that you can see the lines clearly, (I learned this by trial and error too!). You do not need to sew the perimeter border of the maze.

10. Rip off the paper, my kids love helping with this part!

11. Place a flat glass stone, in the opening.

12. Close the opening up, and zig zag stitch around the outside, and you are ready to go!
This fabric maze is a huge hit with my little guy!
He likes to ‘drive the rock’ around he says!

In fact, he loves it so much, he wants me to make one for
ALL OF THE KIDS IN HIS PRESCHOOL CLASS!!

He is so sweet and certain, his mom can do this, and that his friends will just love it, it is hard to say no! So if you don’t see me for a while, I will be making mazes for the masses!


I don’t usually like solid colored things, but for the maze it really works well, you can see the maze better, and you can still have your fun patterned fabric on the back. The front of this game is cream felt!

Thanks for letting me visit Heather, and I wish you all a very Merry Christmas… And as always I love new visitors so come visit me at Ladybird Ln!

Thank you for visiting Carlee and sharing this fabric maze tutorial!
If you love this easy fabric maze tutorial, please help me share it on Facebook and Pinterest!
FABRIC MAZE TUTORIAL
Follow this fabric maze tutorial to make the perfect DIY marble game for your toddler. The printable maze pattern makes it easy!
Yield: 1
Materials
- Fabric Scraps for maze add 3/4 inch to the long and short size of your maze. For my printable, I cut out 2- 7 1/4″ and 10 1/4″ rectangles as well as 2- 2″ squares.
- Contrasting thread you do not want the thread to match the fabric.
- Decorative glass stone or find a bag full of marbles at the dollar store
- Printed Maze
- Ribbon cut 5″ length
Instructions
- 1. Prepare the materials
- 2. Print and cut out maze, and measure the length and width of the maze itself. This maze should be about 6 1/2″ by 9 1/2″ after printing.
- 3. Cut two rectangular pieces of fabric 3/4″ longer then the long and short side of the maze. It works out nicely if you do one solid colored fabric for the front, and a fun patterned for the back… (I learned that after I took these pictures)!
- 4. In addition cut two, two inch fabric squares for the corner piece. Fold the square down the diagonal of the square to make a triange, if using felt just cut the square in half, because you do not need a finished edge.
- 5. On the right side of the front fabric, sew fabric triangles to opposite corners, (this will denote the start and finish of the maze). Look at the maze and make sure you put them in the right corners. Fold the ribbon in half and tack it to the edge of the fabric. Your pieces should now look like the picture above.
- 7. Turn right side out, and press.
- 9. Sew on the paper (it will be ok), directly on the lines of the maze. MAKE SURE YOU BACK STITCH, at every corner, and at the end of every line. It is best if you use a contrasting thread, so that you can see the lines clearly, (I learned this by trial and error too!). You do not need to sew the perimeter border of the maze.
- 11. Place a flat glass stone, in the opening.
- 12. Close the opening up, and zig zag stitch around the outside, and you are ready to go!

What a great idea!! i bet it would be perfect to keep busy with in the car. Also, that piano is fab!
Thanks for having me! I love you wreath!
Carlee
When I try to go to Ladybirdln.com it is a health review site…is there an error? Love the maze…making it for my grandson! Thank you!
This post was from 2011 – I think that Carlee no longer blogs :( I hope that the maze works out for you! xo
What an awesome idea!!!
I’m trying to make these for a busy bag swap and I’m trying to figure out why you did the corners and ribbon
I’m making fidget lap mats for Alzheimer patients. These mazes will be great for care homes, too. Thanks!