Wooden Halloween Spoons Craft

This wooden Halloween spoons craft is so fun to create for spooky season! They make the perfect teacher gift, neighbour gift or simply add a pop of color to your home decor.
Too busy to make this right away? Pin it for later! Pin this tutorial to your favorite craft board on Pinterest and it will be waiting there when you’re ready.

DIY Halloween spoons!
I am always on the lookout for easy crafts to do with the kids! These wooden spoons make the perfect craft for Halloween. Let me show you how to put them together…

The following contains affiliate links.
Supplies needed:
- Wooden Spoon/Spatula x3
- Acrylic Craft Paint – White, Black, Purple, Orange, Pink, Green, Brown, Grey
- Craft Stick, Regular
- Googly Eyes x6
- Permanent Black Marker
- Craft Foam, Black
- Glue Gun and Glue Sticks
- Ribbons, assorted
- Buttons, assorted
- Paintbrush
- Scissors
- Pencil with New Eraser

All of my craft supplies were found at Dollarama! But you could order them online using the links above as well.

How to create Halloween wooden spoons:
1. Gather all supplies.
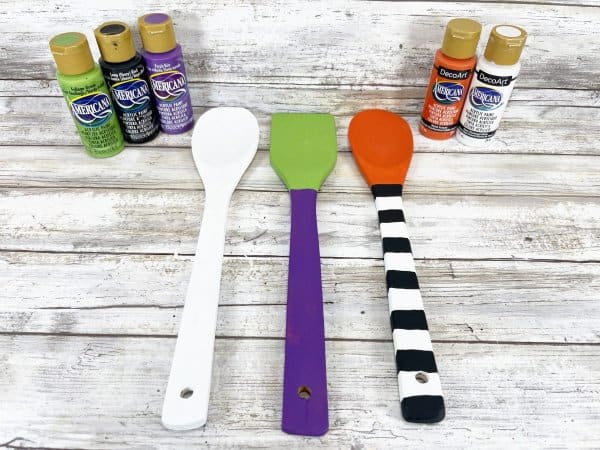
2. Paint one wooden spoon with white acrylic craft paint for the Ghost. Coat another wooden spoon with orange acrylic craft paint on the top, with white and black stripes on the bottom for the Jack-O-Lantern. Paint the last wooden spatula with green acrylic craft paint on the top and purple on the bottom. Let dry and apply a second coat, if necessary.
3. Paint zig zag hair on Frankenstein with black acrylic craft paint. Basecoat both ends of a wooden craft stick with grey acrylic craft paint. Paint the center of the craft stick with brown acrylic craft paint.

Let the paint dry…
4. Using scissors, cut the rounded ends off a wooden craft stick, leaving three pieces. Attach the brown section to the top center of the back of the Jack-O-Lantern with a glue gun and glue sticks. Secure the two grey craft stick pieces to Frankenstein’s neck.
5. Attach two wiggle eyes to each wooden spoon with a glue gun and glue sticks.

6. Create their cheeks by dipping a new pencil eraser into pink acrylic craft paint.
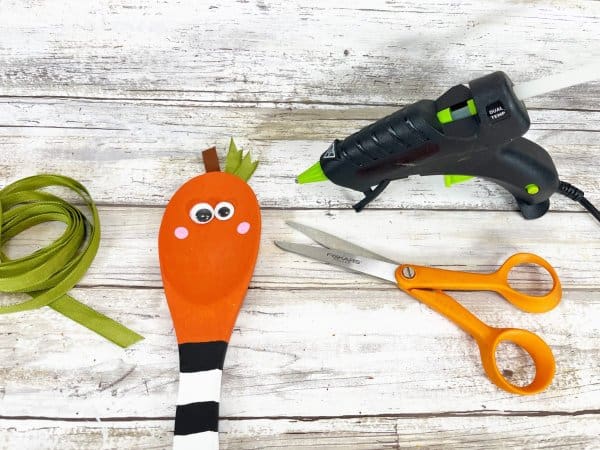
7. Attach two short lengths of green ribbon beside the pumpkin stem on the Jack-O-Lantern with a glue gun and glue sticks. Trim any long ends of the ribbon with scissors.

8. Basecoat the rounded end of a craft stick with green acrylic paint. Cut the end to ½” long with scissors and glue to Frankenstein as his nose. Cut a small rectangle from black craft foam and glue to Frankenstein as his eyebrow.

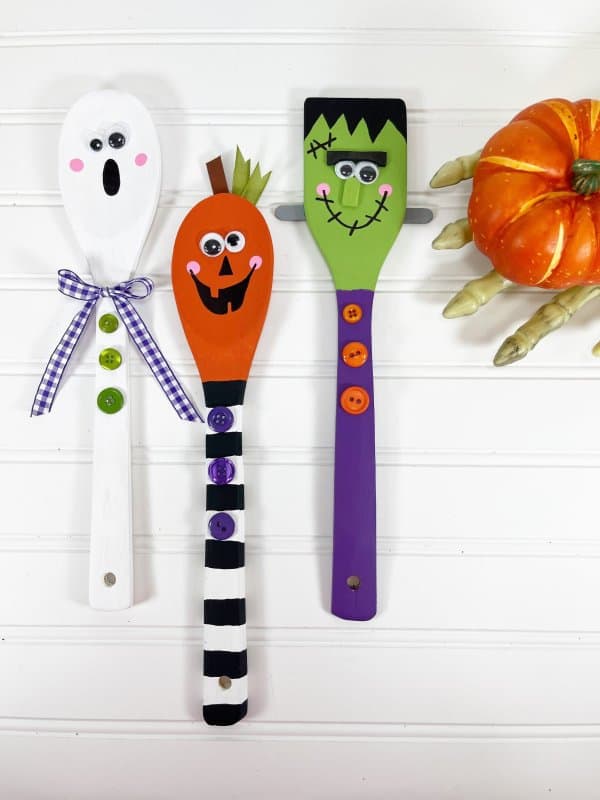
9. Using a permanent black marker, give the Ghost an oval mouth, give the Jack-O-Lantern a toothy mouth, and give Frankenstein a stitched mouth and scar.
10. Tie a purple ribbon bow around the neck of the Ghost, securing with a dot of glue. Attach three colored buttons to the handle of each wooden spoon with a glue gun and glue sticks.

Change up the colors and embellishments on the wooden spoons to create a variety of Halloween creatures to share with family and friends.
Halloween Spoons!
Super adorable right?! I love their individual hair styles and the little details of each face.

The kids would love to make these cute spoons to gift to friends or use as Halloween decorations themselves. If you make a DIY Halloween Wooden Spoon Craft I would love to see it, please share your photos!

This post contains affiliate links.
Some of my crafting must haves:
- We love using these Apple Barrel Acrylic Paints to add bright color to all of our projects.
- These paint brushes are ideal for most craft surfaces and a great price!
- This art supplies kit is our favorite because it has everything we needed to get started.
- This rolling storage cart helps to keep our craft supplies organized.
If you love this Wooden Halloween Spoons Craft, please give it a five star review and help me share it on Facebook and Pinterest so that others can enjoy it too!

Halloween Wooden Spoons Craft
Materials
- Wooden Spoon/Spatula x3
- Acrylic Craft Paint – White Black, Purple, Orange, Pink, Green, Brown, Grey
- Craft Stick Regular
- Googly Eyes x6
- Permanent Black Marker
- Craft Foam Black
- Glue Gun and Glue Sticks
- Ribbons assorted
- Buttons assorted
- Paintbrush
- Scissors
- Pencil with New Eraser
Instructions
- 1. Gather all supplies.
- 2. Paint one wooden spoon with white acrylic craft paint for the Ghost. Paint another wooden spoon with orange acrylic craft paint on the top, with white and black stripes on the bottom for the Jack-O-Lantern. Paint the last wooden spatula with green acrylic craft paint on the top and purple on the bottom. Let dry and apply a second coat, if necessary.
- 3. Paint zig zag hair on Frankenstein with black acrylic craft paint. Basecoat both ends of a wooden craft stick with grey acrylic craft paint. Paint the center of the craft stick with brown acrylic craft paint.
- 4. Using scissors, cut the rounded ends off a wooden craft stick, leaving three pieces. Attach the brown section to the top center of the back of the Jack-O-Lantern with a glue gun and glue sticks. Secure the two grey craft stick pieces to Frankenstein’s neck.
- 5. Attach two wiggle eyes to each wooden spoon with a glue gun and glue sticks.
- 6. Create their cheeks by dipping a new pencil eraser into pink acrylic craft paint.
- 7. Attach two short lengths of green ribbon beside the pumpkin stem on the Jack-O-Lantern with a glue gun and glue sticks. Trim any long ends of the ribbon with scissors.
- 8. Basecoat the rounded end of a craft stick with green acrylic paint. Cut the end to ½” long with scissors and glue to Frankenstein as his nose. Cut a small rectangle from black craft foam and glue to Frankenstein as his eyebrow.
- 9. Using a permanent black marker, give the Ghost an oval mouth, give the Jack-O-Lantern a toothy mouth, and give Frankenstein a stitched mouth and scar.
- 10. Tie a purple ribbon bow around the neck of the Ghost, securing with a dot of glue. Attach three colored buttons to the handle of each wooden spoon with a glue gun and glue sticks.

These are simply adorable! I can see this idea used for all the big holidays! How cute would a crock fill of these be on the kitchen counter or maybe added to a floral arrangement.
Thanks so much!! Fun right?!