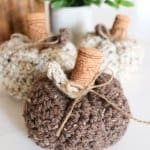
Crochet Pumpkin Pattern
This easy crochet pumpkin pattern is absolutely darling, free and whips up quickly! It's perfect for creating lovely little pumpkins to add to your decor this year.
Yield: 1
Cost: $5
Instructions
- Crochet Ch 32, HDC into the 3rd ch from the hook.
- Crochet Ch 2, turn your work and HDC across (30).
- Crochet 3-12: HDC across (30).
- Fold the work in half, seams together. Sew the ends together. You can do this by either slip stitching or sewing the ends together with a tapestry needle. Make sure not to leave any gaps so there are no holes in the pumpkin.
- Now, weave the bottom circle closed by going in and out every couple of stitches with the long yarn tail. You can use a whip stitch or loosely sew with a darning needle and then pull tight to close. Weave through the stitches together to tighten the bottom.
- Turn the work inside out and then stuff pumpkin with polyfil. Stuff it well because when you make your pumpkin ridges, your pumpkin will get shorter and smaller so you want to make sure you’ve got lots of filling to keep it nice and plump!
- Weave the yarn end in and out of the top stitches and then pull to cinch closed. Go through the stitches to tighten just as you to close up the bottom.
- To make the pumpkin ridges, take the end of yarn along the outside of your pumpkin and go through the center of the pumpkin bottom and then up through the top and pull tight. Continue doing this till you’re happy with the amount of ridges. Weave your end in and out of the pumpkin to secure and hide your tail.
- To make the leaf crochet Ch 7.
- Down the chain. Sl St in the 2nd ch, sc, sc, hdc, hdc, DC 4 in the last stitch.
- Working on the bottom side of the chain, complete the following: hdc, hdc, sc, sc, sl st in the last and then sl st to the first sl st from round 1 to finish off. Weave in your ends.
- Using a glue gun, fasten the stem to the top of the pumpkin.
- Sew the leaf to the top and then finish off with a bow.