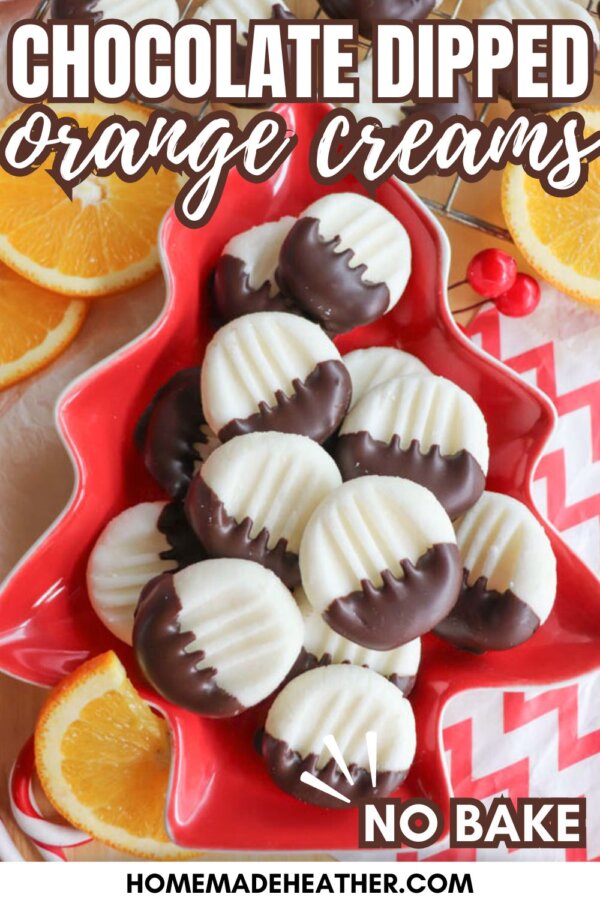
Chocolate Dipped Orange Creams Recipe


You know when the internet just collectively decides something needs to happen immediately? That’s exactly how these Chocolate Dipped Orange Creams came to life.
I shared our Christmas Cream Cheese Mints with my Facebook community — the cute little peppermint ones that disappear faster than my teens can inhale a Costco-sized box of granola bars — and someone commented, “Hey… what if you made them orange?”
And suddenly the comment section turned into a full-on flavor brainstorming session. Orange extract! Dark chocolate dip!
Maybe even a little zest! People were tagging friends, cousins, neighbors, their coworker Barbara — and I knew something magical had begun.
Too busy to make this right away? Pin it for later! Pin this post to your favorite board on Pinterest and it will be there when you’re ready!
So I tested a batch or two and posted a video asking, “what should we call these?”. Then, naturally, everyone immediately wanted the recipe. Not “when you get a second,” not, “Oh let us know.” No. They wanted it like, yesterday.
Meanwhile, I’m in my kitchen with powdered sugar all over the counter, and the fridge door hanging open while someone yells, “MOM, are these ready to try or do they still need to go in the fridge or whatever?”
This is my life. And honestly? I love it.
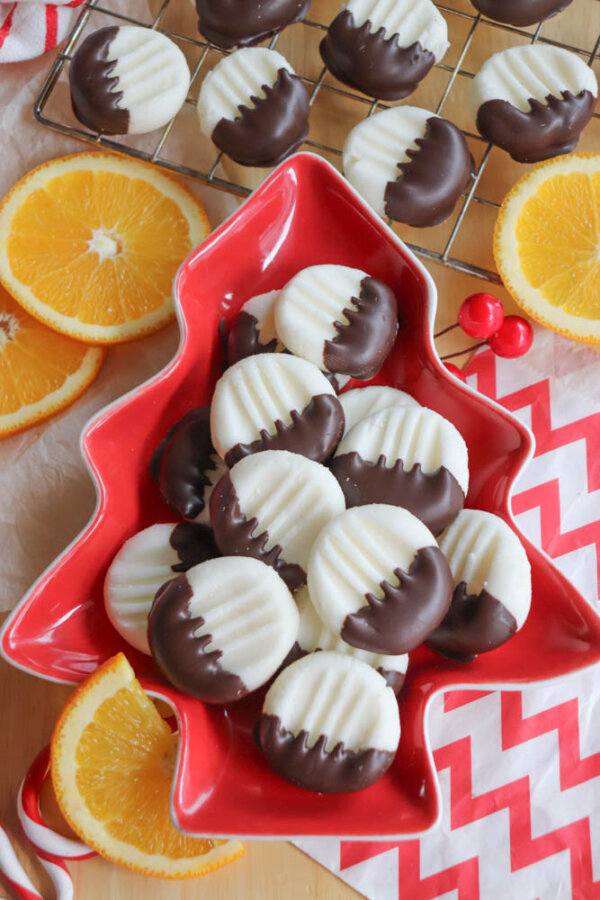
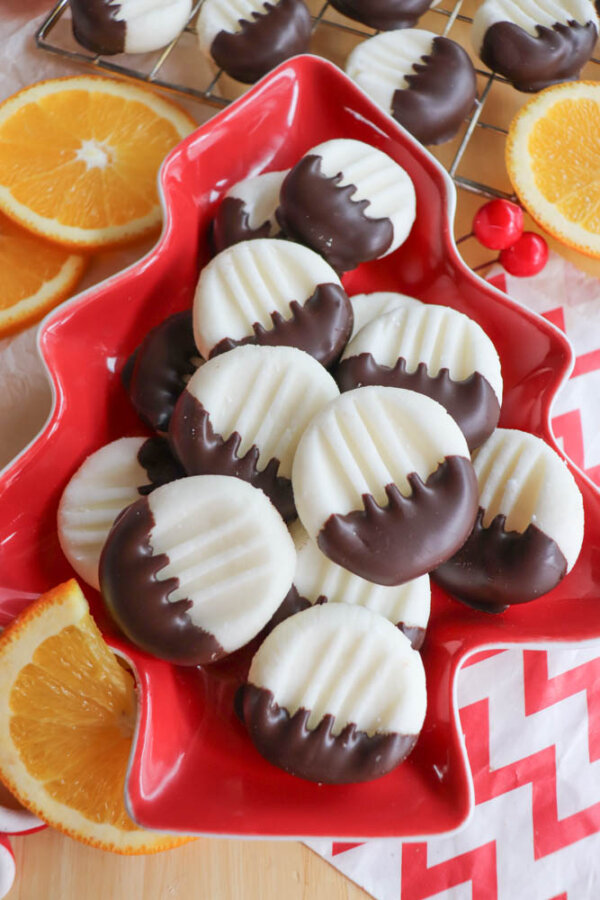
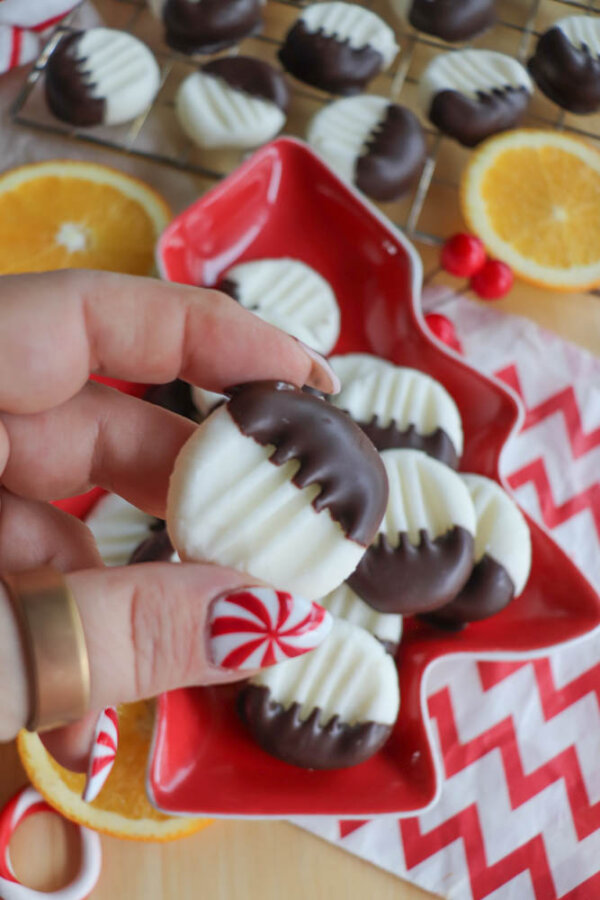
But I didn’t want to leave Facebook hanging too long, so here you go my friends! The delicious little candies you helped to name, “Orange Creams”.
Why You’ll Love These Orange Candies
This recipe is delightfully simple, completely no-bake, and tastes like something you’d find in a beautiful holiday gift box. The orange flavor is bright and refreshing, the texture is velvety and soft, and the dark chocolate adds just the right amount of richness.
These creams feel festive and nostalgic all at once, and they come together in minutes — which means they’re perfect for quick treats, neighbor gifts, cookie exchanges, or when your teens announce right now that they need snacks to bring to a party.
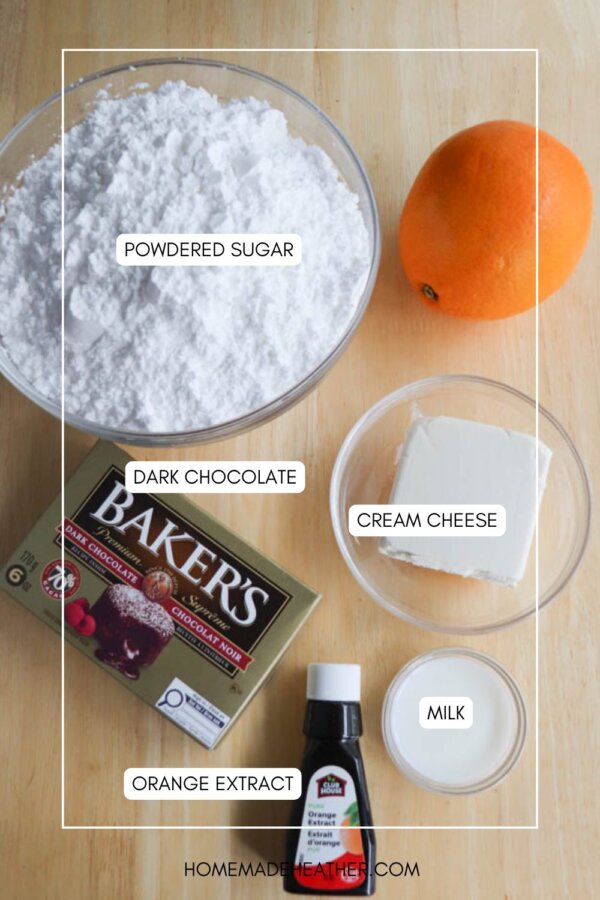
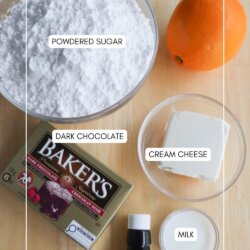
Ingredients
- Cream cheese, room temperature – adds the ultra-smooth, creamy base that gives these candies their signature melt-in-your-mouth texture.
- Powdered sugar – sweetens the mixture and creates that soft, creamy structure that holds the candies together.
- Milk – adds just enough moisture to blend everything into a workable dough.
- Orange extract – provides the bright, citrusy flavor that makes these taste like Christmas magic.
- Dark chocolate – creates a thin, rich chocolate shell that balances the creams and makes them totally irresistible.
Instructions
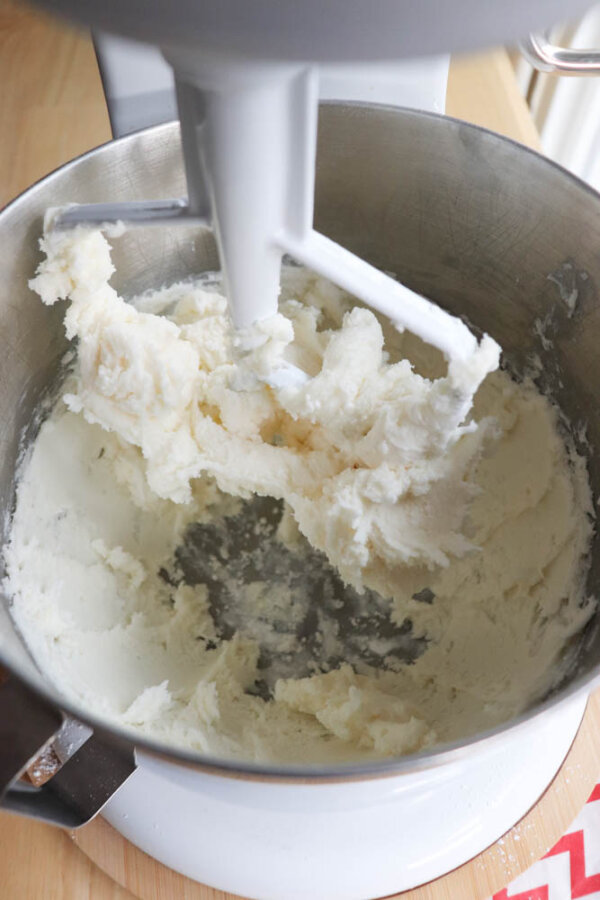
1. In the bowl of a stand mixer fitted with a paddle attachment, cream together the cream cheese and orange extract until smooth and fully combined.
2. Add 2 cups of the powdered sugar and the milk. Mix on medium speed until creamy.
3. Add the remaining powdered sugar and mix on low until the dough forms and begins to pull away from the sides of the bowl. It should be soft, smooth, and easy to roll.
4. Roll the mixture into small balls, about 1 inch in size. If the dough feels sticky, chill it for 10 minutes or dust your hands with powdered sugar to help shape the candies easily.
5. Place the rolled balls on a parchment-lined baking sheet and refrigerate for 30 minutes so they firm up.

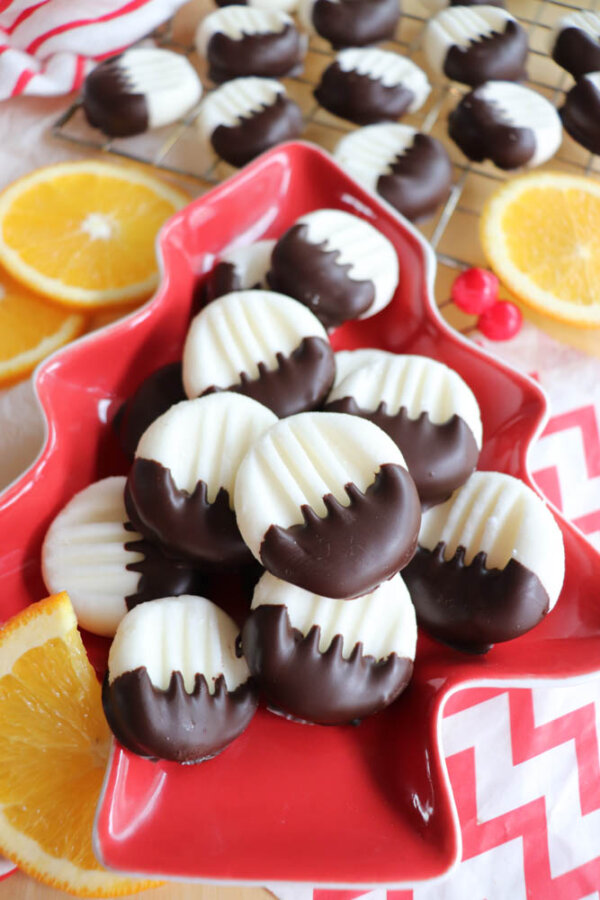
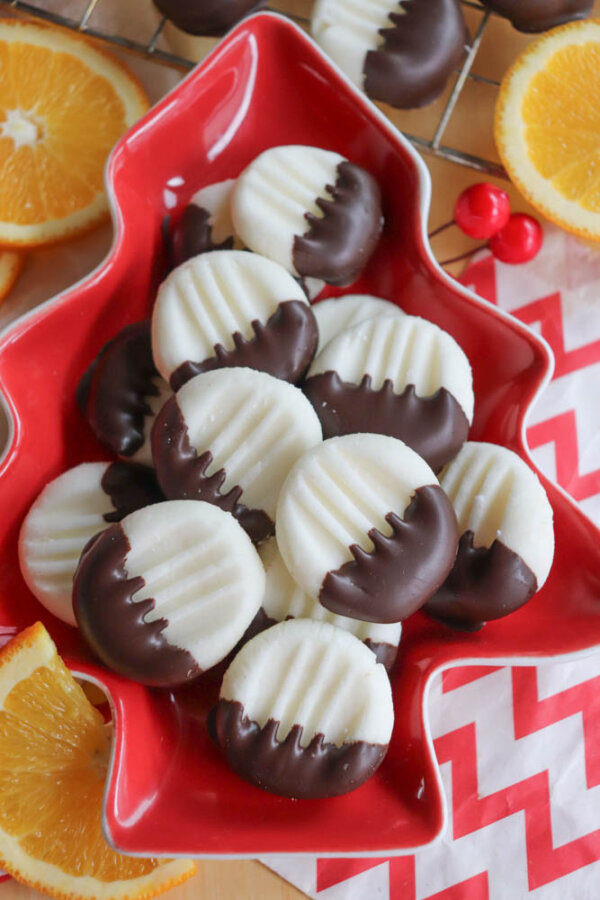
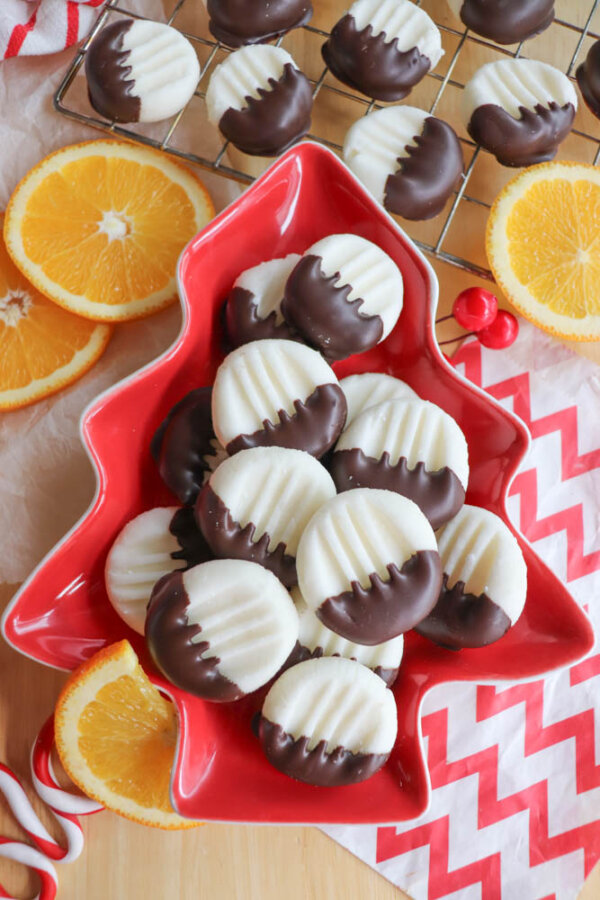
6. After chilling, use the back of a fork to gently press each piece to about 1/4-inch thickness, creating a ridged pattern on top.
7. In a small microwave-safe bowl, melt the dark chocolate in 15-second increments, stirring between each interval until smooth.
8. Dip each cream halfway into the chocolate and place it back onto the parchment-lined sheet.
9. Refrigerate for about one hour to allow the chocolate to fully harden. Store in an airtight container in the refrigerator for up to a week, or freeze them for longer storage.
Tips for Best Results
- If your dough is sticky, a short chill in the fridge makes rolling much easier.
- High-quality orange extract makes a big difference in flavor — avoid anything that tastes artificially perfumey.
- Make sure your chocolate melts slowly and stir often to avoid scorching.
- A sprinkle of orange zest on top before the chocolate sets adds extra citrus flavour.
These freeze beautifully — perfect for December baking sprints or “I need something sweet right now” emergencies.
Frequently Asked Questions
Can I dip these in white chocolate instead?
Yes — but they’ll be sweeter. Dark chocolate offers a great flavor contrast.
Do they have to be refrigerated?
Yes, because the cream cheese keeps them soft. Chilling helps them hold their shape and stay fresh.
Can I use fresh orange juice instead of extract?
Extract works best since it provides strong flavor without adding extra liquid.
These Chocolate Dipped Orange Creams are bright, creamy, melt-in-your-mouth sweet with a rich dark chocolate finish that tastes like fancy holiday chocolate shop candy — except they take only minutes to make and require zero baking. Perfect for holiday trays, gifting, or eating while standing at the counter pretending you’re only “taste testing.”
If you love these chocolate dipped orange creams, please give them a five star review and help me share them on Facebook or Pinterest so that others can enjoy them too!

Chocolate Dipped Orange Creams Recipe
Ingredients
- 4 oz cream cheese room temperature
- 4 cups powdered sugar
- 1 Tbsp milk
- 1 tsp orange extract
- 4 oz dark Baker’s chocolate
Instructions
- In the bowl of a stand mixer fitted with a paddle attachment, cream together the cream cheese and orange extract until smooth and fully combined.
- Add 2 cups of the powdered sugar and the milk. Mix on medium speed until creamy.
- Add the remaining powdered sugar and mix on low until the dough forms and begins to pull away from the sides of the bowl. It should be soft, smooth, and easy to roll.
- Roll the mixture into small balls, about 1 inch in size. If the dough feels sticky, chill it for 10 minutes or dust your hands with powdered sugar to help shape the candies easily.
- Place the rolled balls on a parchment-lined baking sheet and refrigerate for 30 minutes so they firm up.
- After chilling, use the back of a fork to gently press each piece to about 1/4-inch thickness, creating a ridged pattern on top.
- In a small microwave-safe bowl, melt the dark chocolate in 15-second increments, stirring between each interval until smooth.
- Dip each cream halfway into the chocolate and place it back onto the parchment-lined sheet.
- Refrigerate for about one hour to allow the chocolate to fully harden. Store in an airtight container in the refrigerator for up to a week, or freeze them for longer storage.
Notes
Nutrition

Question: do I really need a stand mixer? I tried this out with a hand mixer and the mixture never formed up into a dough like consistency. It tastes great, but it won’t form into balls.
Is the mixer where I went wrong?
Thanks!
It takes a lot of mixing! You could try again with a hand mixer and add more milk maybe.
I can’t seem to find the dark baking chocolate… would semi-sweet work? I saw other cocoa amts, but nothing that said dark chocolate. thank you
I found dark Bakers chocolate in the baking aisle of my local grocery store – semi sweet chocolate would totally work too!
Great taste. Easy to make. Only problem I had with them they get too soft to handle. Needed to keep refrigerating them. When serving if left on serving tray too long without chilling they get extremely soft.
Interesting! Next time try omitting some of the milk – I am finding that they are softer in different climates/with humidity.
I just took it one step further and colored them orange with food coloring, and then dipped them in the chocolate so they look like my little orange creams. I also followed the recipe and the flavoring that I used was maraschino cherry juice, or you could use almond extract and make cherry mints. I love this because it’s so easy.
Ooooo I love that!