DIY Accent Table Tutorial


It is the perfect sofa table for our space. Be sure to check out the rest of the living room with this turquoise gallery wall home tour or our rustic woodland dining room.

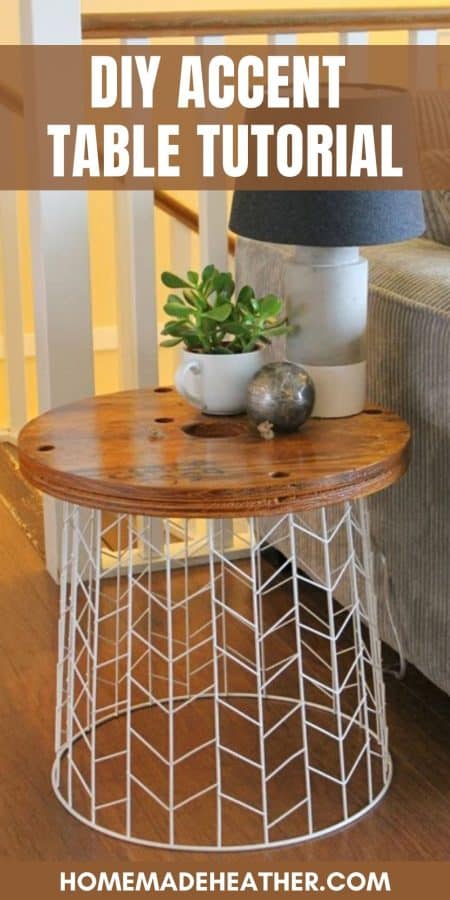
The entire project only cost $12! Seriously. $12 #forthewin!
Target has an awesome home decor section. I love just about everything this season! It would all look absolutely fabulous in our home. So when I saw this black wire accent table at Target for $99 I was determined to knock it off.
Here’s how to create your own DIY Accent Table:

Target also sells wire umbrella/laundry baskets for $12 – $20. I purchased a white one and just flipped it upside down to create a table base. Easy peasy right?

Next I went to Home Depot to see if they could possibly cut a circle of wood for me? Pretty please?!? Alas they only offer straight cuts in store but the sales associate said that he had just put a set of cable spool ends in the dumpster, would they work? Um, YEAH!!
So I took home two circles of plywood about 19.5″ in diameter for FREE. You can find these at most home supply stores, just go in and ask if they have any lying around.

I wanted a thicker look to the table top so I glued the two cable spool ends together using no more nails adhesive. I lined up the holes in each piece of wood for a unified look before gluing.

This is one of the pieces that had some numbers and letters stained into the wood. I wanted to work with that vintage feel so I added “Circa 1999” and “Kelo” (the first few letters in the name of the city where we live) with black acrylic paint.

After the paint dried I sanded the entire surface smooth using my hand sander.

About the stain…
I chose to stain the entire table top with a slightly red tinged stain to complement the Mid Century Danish Antique that I had found a few weeks ago. After the stain was set I covered it with a few coats of polyacrylic sealer. Finally I fastened the top to the wire basket using jute (strung through the holes) and all purpose glue (like E6000) underneath.

Here you can see where the holes were lined up and where the jute was fastened.

We love the hole in the center because it’s perfect for putting your cup into and acts like a cup holder. Dude, so cool!

Take a look at our finished DIY accent table from every single angle of the living room…


DIY End Table Tips:
- Use a wooden top and hairpin legs to create a simple design.
- Create a farmhouse style with rustic supplies from the local hardware store.
- Use laundry baskets for a unique look with geometric shapes.
- Create a vintage look using natural elements, wood filler and stain.

Did you use this DIY Accent Table Tutorial? I would love to see the finished project, please share! Thanks so much for stopping by.
[mv_create title=”DIY Furniture” key=”102″ type=”list” layout=”hero”]

What a great idea–so pretty!
Thank you!
Great! I love wire elements because they make furniture look light and floaty.
I agree! Thanks for visiting!
You’re a genius!!!
I would never have thought of that in a million years – fantastic job!!!
Thank you so much!
This is genius! I’ll be featuring you for sure :)
Awww thank you so much! xo
This is awesome, Heather! So funny, I picked up a very similar laundry basket (on clearance for $9) yesterday with plans to do the same thing! I headed stray to Lowes and could a circle top (one of the pre-cut circle tray type boards) but it was pricey at $19. I am going to have to run in tomorrow and see if they have any cable spools. Thanks so much for sharing! I just love it :)
NO way! Great minds think alike *wink* let me know when you finish it I would LOVE to see it! xo
Gorgeous! Thanks for linking up at the Create Link Inspire party! You were featured today!
Thanks so much Amy!! xo
Thanks for linking to Create Link Inspire at The Crafty Blog Stalker. You have been featured and pinned! Thank you for sharing.
–Katie, TheCraftyBlogStalker.com
Thanks Katie! That’s awesome! xo
Oh my goodness! Genius! I LOVE it!
Thank you!
awesome diy. how dare they charge 99 bucks when they sell the same exact shaped base for so much less.
I love that table! So much character and fits perfectly!
So clever, inexpensive, and relatively easy! Just the kind of project I like!
Awesome job. I like yours better. The holes and little imperfections make it so original!
Gorgeous!! LOVE ! I would love for you to share on my Chic By You Link Party @ https://chicbytab.blogspot.ca/2014/03/chic-by-you-wednesday-link-party-2.html. Hope to see you there!
I’m totally going to do this!! Genius!1
Beautiful ! Great job and love the price tag as well !
That is one AWESOME table! Excellent idea and job!
This would be perfect on my new screened porch!
Love it! And so cheap!
I love the side table!! Awesome job! Random question, where did you get your couch, that is exactly what I’m looking for.
It is AWESOME! Super soft and durable – I found it at Urban Barn and must say that the service was fantastic too! Have fun! xo
I love the stain color! What color is it?
Thank you! Redwood is the color :)
Thanks so much! I can’t wait to stain something in that color! :0)