Polymer Clay Sloth Magnet Craft

This polymer clay sloth magnet craft is fun to create and makes the cutest little magnets that you have ever seen! Follow the easy step by step photo tutorial…
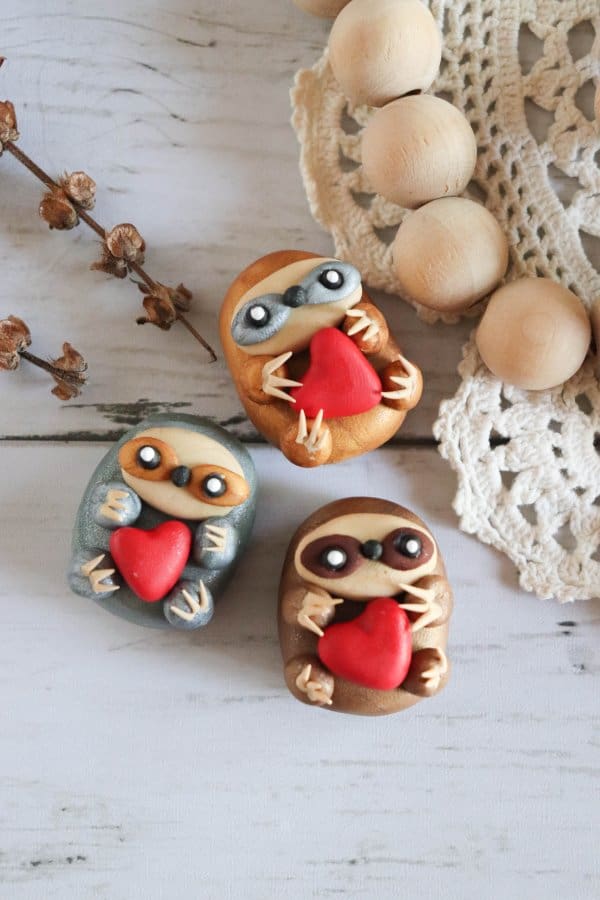
How cute are these clay sloths?! Too busy to make them right away? Pin this post for later! Pin this project to your favorite craft board on Pinterest and it will be there when you’re ready.

Be sure to check out a few of my other polymer clay projects like these darling Mini Clay Succulents and these adorable Clay Smores!

This post contains affiliate links.
Supplies that you will need:
- parchment paper
- baking sheet
- polymer clay in blown, tan, red and black
- clay cutting and shaping tools
- white glue
- white paint
- mod podge
- paint brush
- magnet

How to make these polymer clay sloth magnets:
- Begin by forming the clay into soft, malleable balls.

2. Roll a brown 6cm ball for the body, four brown 1 cm balls for hands, 1cm tan ball for the mask, two ½ cm brown balls for eyes, four ¼ cm tan balls for claws and three tiny black balls for the nose and eyes.
3. Form the brown ball into rounded rectangular shape.
4. Form the small brown balls into hands.

5. Form the tan ball into a mask and place it on the front of the body near the top.
6. Form the two smaller brown balls into almond shaped eyes and press them to the mask. Use a stylus tool to press a circular indent into each eye.
7. Place a tiny black ball between the eyes for the nose and black balls in the eye indents.

8. Form each of the tiny tan balls into claws using a cutting tool and press to each of the hands.

9. Press the hands to the body of the sloth.

10. Make three, ½ cm red hearts out of clay (optional).

11. Bake as directed on the package.

12. When the clay cools, seal with mod podge and glue a magnet to the back.
Polymer clay crafting tips:
- Work with a high quality product like sculpey clay.
- Use plastic wrap in an air tight container to store clay.
- Score where you want two pieces of clay to stick together.
- Shape cutters work best on a flat, solid work surface.
- A craft oven is not needed.
- Bake at low temperatures to allow the clay to set slowly and prevent cracking.
- You can find clay of all kinds of different colors at Michaels stores.

These clay sloth magnets are seriously so adorable. They are way easier to create than they look and make the perfect little gift or ornament on the fridge. This easy craft is a great way to add a spot of whimsy to your space!

My essentials for clay crafts:
- We love using this Sculpey Polymer Oven Bake Clay for all of our projects.
- This clay shaping tool kit is a must have for clay crafting!
- These paint brushes are ideal for most craft surfaces and a great price!
- This rolling storage cart helps to keep our craft supplies organized.

These clay sloths would make darling Valentines gifts for friends and family don’t you think?!

You could even write tiny little sayings on the hearts!

I love that this would be a really easy and fun animal craft to make with the kids! The combination of colors and shapes could be endless and it would be neat to see what they come up with.


If you love this polymer clay sloth magnet craft, please help me share it on Facebook and Pinterest so that others can enjoy it too!

Polymer Clay Sloth Magnet Craft
Materials
- parchment paper
- baking sheet
- polymer clay in blown tan, red and black
- clay cutting and shaping tools
- white glue
- white paint
- mod podge
- paint brush
- magnet
Instructions
- 1. Begin by forming the clay into soft, malleable balls.
- 3. Form the brown ball into rounded rectangular shape.
- 4. Form the small brown balls into hands.
- 6. Form the two smaller brown balls into almond shaped eyes and press them to the mask. Use a stylus tool to press a circular indent into each eye.
- 7. Place a tiny black ball between the eyes for the nose and black balls in the eye indents.

More clay craft projects:
[mv_create key=”279″ layout=”hero” thumbnail=”false” title=”Clay Crafts” type=”list”]

Hi Heather, I’d love to do the polymer slot magnet craft as a program for both teens and adults at my public library this upcoming February. Could I use your image to promote the event via social media and our newsletter if leave your website information on the image?
Sure! Please add a link “homemadeheather.com” Thanks for asking!