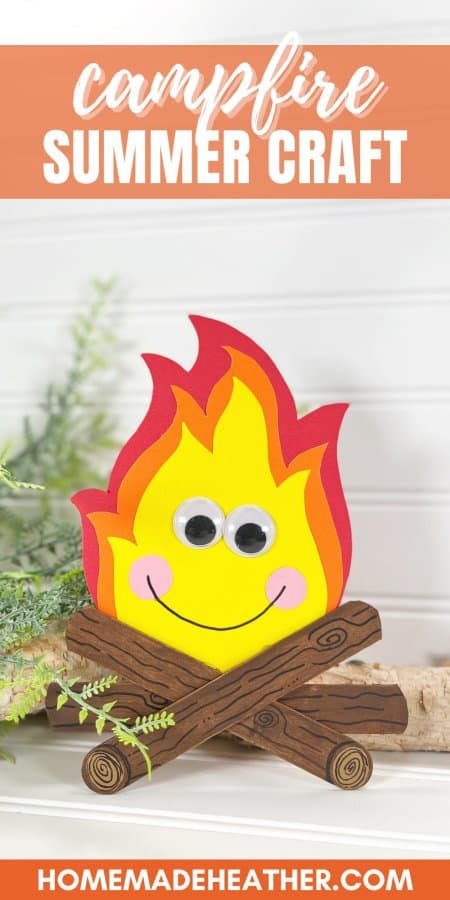
Campfire Summer Craft
Get creative with this Campfire Summer Craft! Gather around the fire, roast marshmallows and make fun crafts inspired by nature.
I have always had good luck at dollar stores with finding inexpensive and easy craft ideas. It is so much fun to go up and down the aisles, looking at all the great decorations and seasonal items.
To me, it is the perfect way to find inspiration for my own design ideas.
Too busy to make this right away? Pin it for later! Pin this post to your favorite board on Pinterest and it will be there when you’re ready!
For anyone planning on heading into the great outdoors this summer, today’s craft is the perfect activity to prepare younger kids, especially those who have never been on a camping trip before. It is so much fun to make too.
Using simple craft supplies from the dollar store and the recycling bin, create this quick and easy Craft Stick Campfire craft with kids of all ages in just 30 minutes.
This post contains affiliate links.
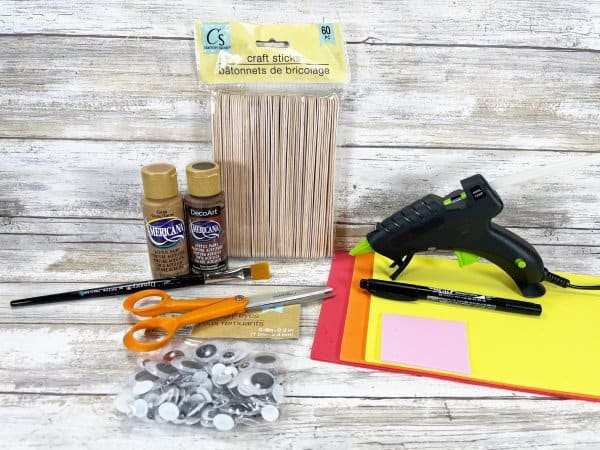
Supplies:
- Craft Sticks, Jumbo
- Cardstock – red, orange, yellow & pink
- Wiggle Eyes
- Acrylic Craft Paint – brown & tan
- Paintbrush
- Glue Gun and Glue Sticks
- Scissors
- Pencil
- Washable Marker, Black
- Campfire Pattern – below
Instructions:
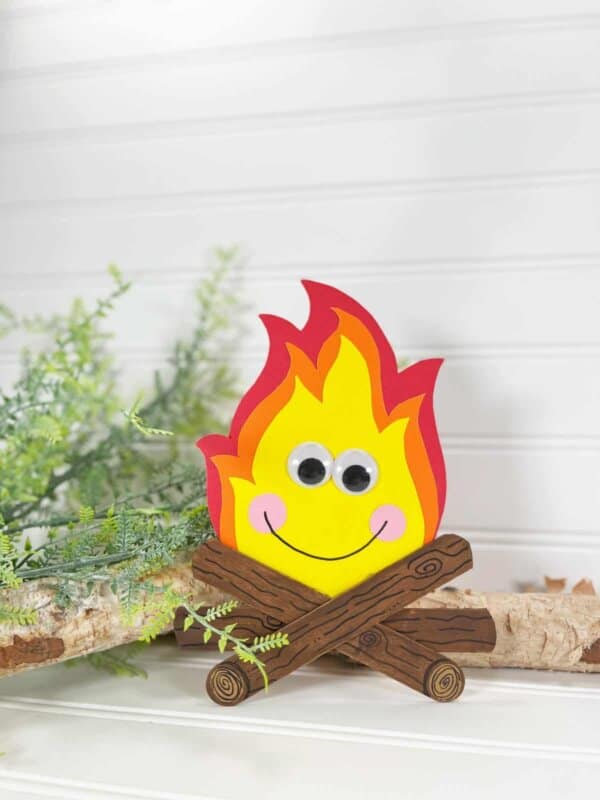
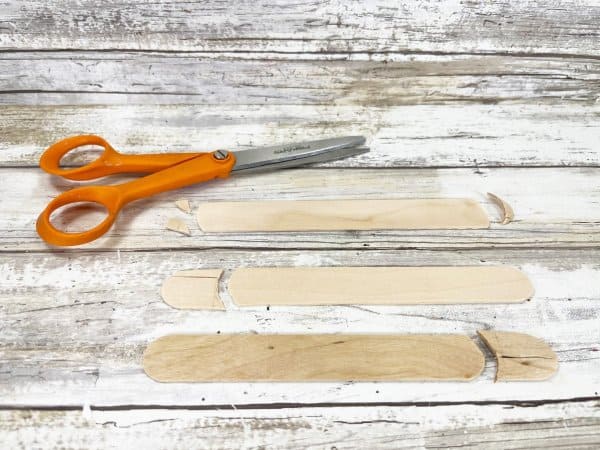
1.Gather all supplies. Using scissors, cut both rounded ends from one jumbo craft stick. Cut one rounded end from two jumbo craft sticks.
2. Basecoat the three trimmed jumbo craft sticks with dark brown acrylic craft paint. These will become the campfire logs. Let dry, and apply a second coat, if necessary.
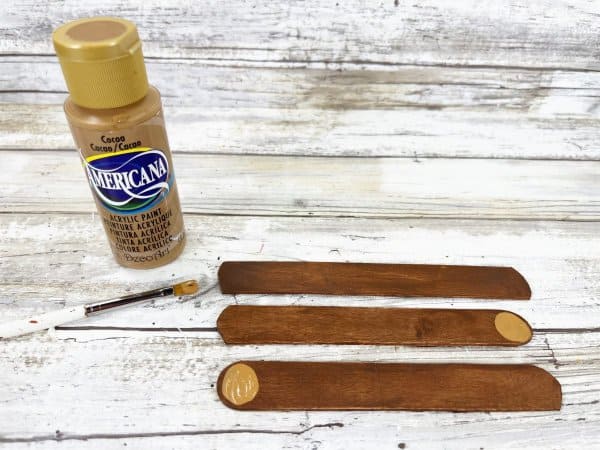
3. Paint circles with tan acrylic craft paint on the remaining two rounded ends of the two jumbo craft sticks. Let dry, and apply a second coat, if necessary. You can use washable markers, crayon, or even colored pencil to color the jumbo craft sticks.
4. Using a washable black or brown marker, draw random lines on the logs to look like tree bark. On the ends of the logs, draw a spiral circle to look like the tree rings.
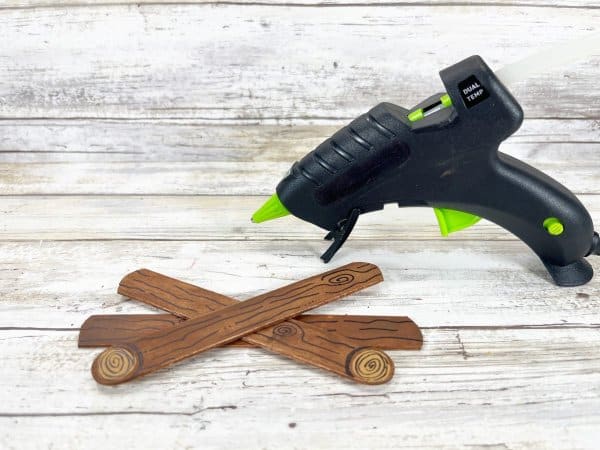
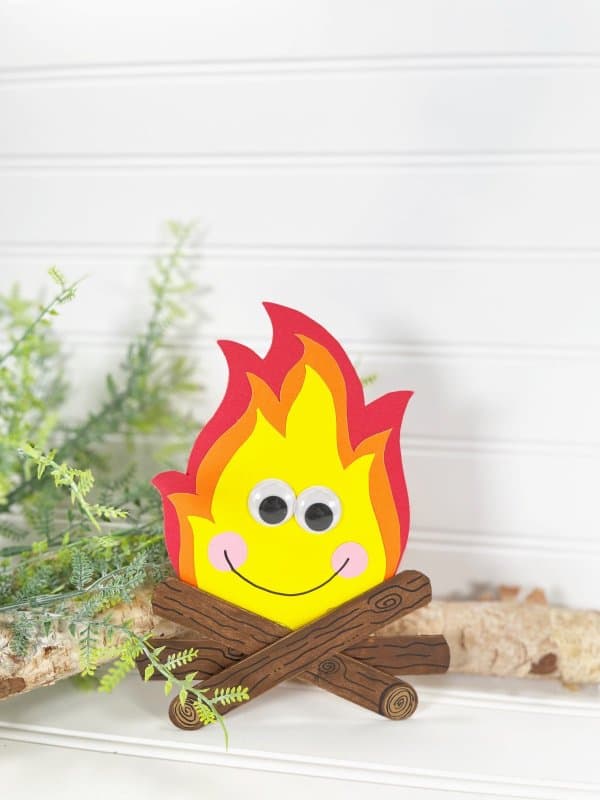
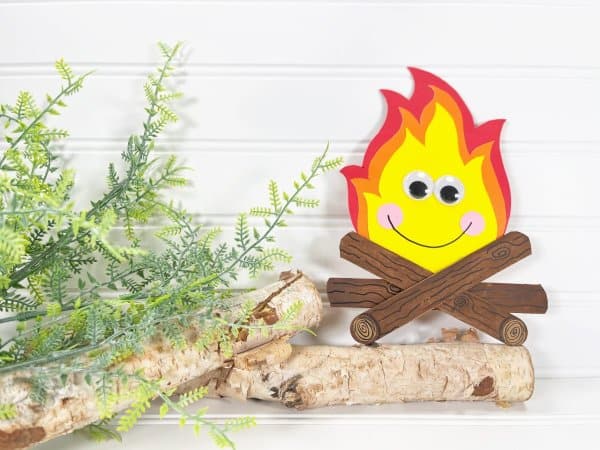
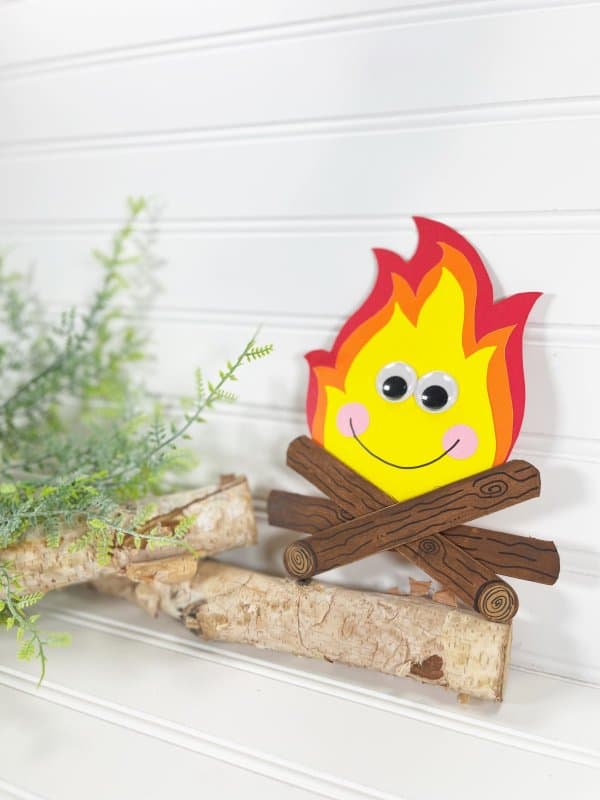
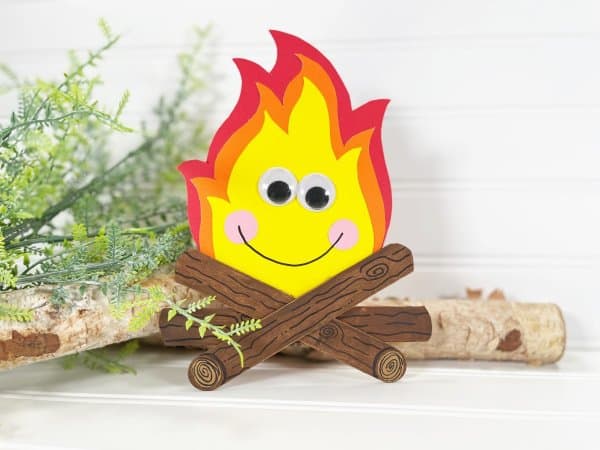
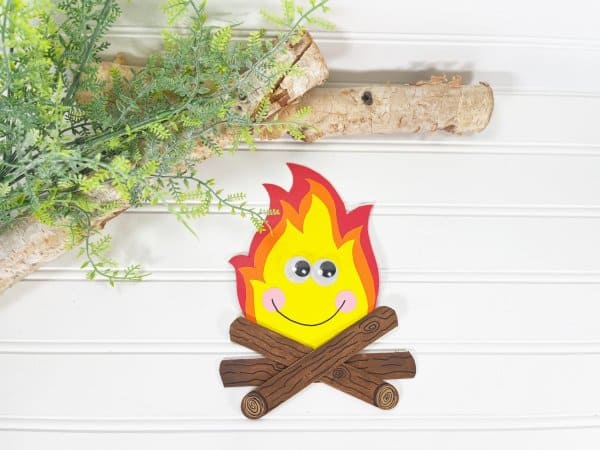
5. Stack the three craft stick logs on top of each other in a criss cross pattern and secure with a glue gun and glue sticks.
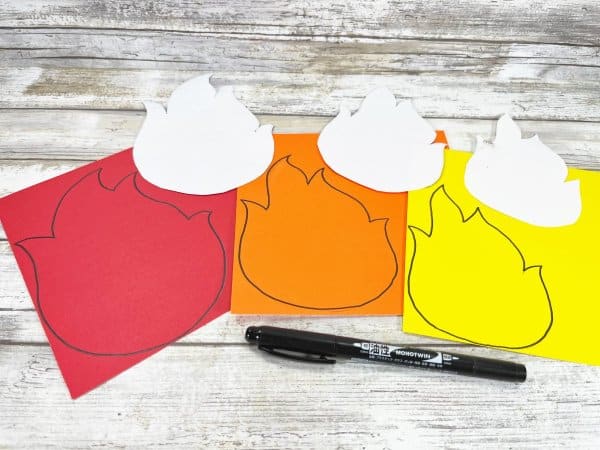
6. Download, print, and cut out the pattern. Trace the campfire template pieces onto the cardstock with a pencil or marker. Trace the largest flame on red cardstock, the middle flame onto orange cardstock, and trace the smallest flame onto yellow cardstock.
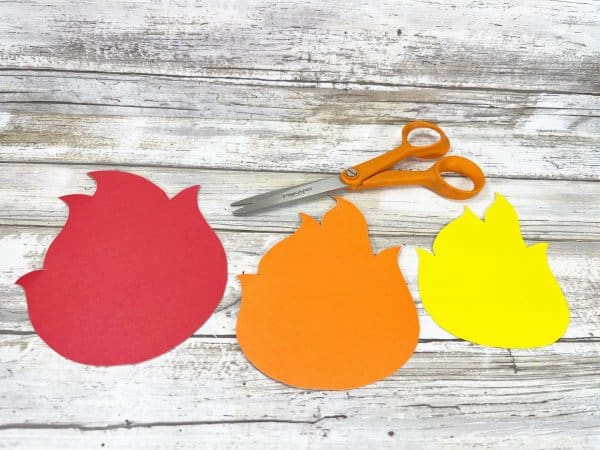
7. Cut all three of the flame shapes out of the cardstock with scissors.
8. Layer the campfire flames on top of each other from largest in the back to smallest in the front. Secure each of the three layers together with a glue stick.
9. Flip the campfire logs over and attach the flames to the top edge using a glue gun and hot glue. You can use liquid craft glue for this project, but you will have to wait for it to dry.
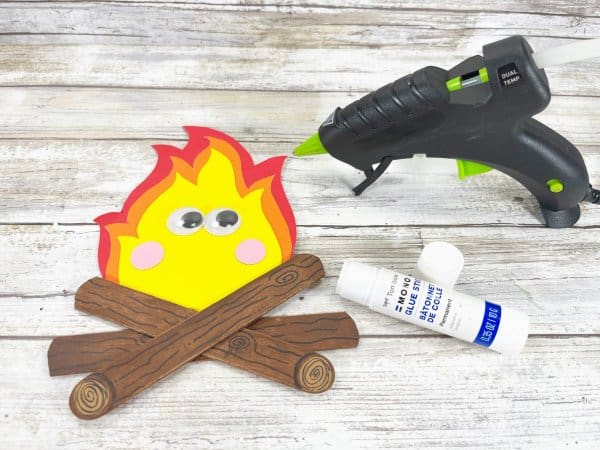
10. Trace the cheek patterns onto pink cardstock using a pencil or marker, and then cut out with scissors.
11. Secure the cheeks on either side of the flame with the glue stick. Attach two large wiggle eyes to the campfire flame using a glue gun.
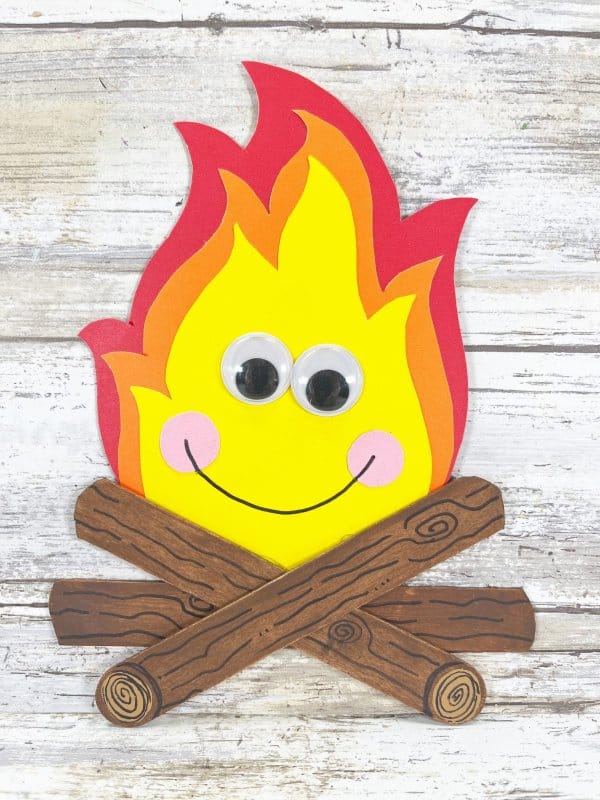
12. To finish, draw a smile on the campfire flame’s face from cheek to cheek with a washable black marker.
Tips and Tricks:
- Giving young kids a chance to practice with scissors is a great way to help develop fine motor skills.
- If you don’t have cardstock, use brown, red, and orange construction paper instead.
- For added complexity for older children, glue this craft stick campfire to a piece of cardboard and add some small rocks around the base of the fire.
- Make a 3D version of this simple campfire craft. Use cardboard tubes, like empty toilet paper or paper towel rolls, for the logs. Add red, orange, and yellow tissue paper fire on top of the logs.
- Make handprint campfires with paint on white paper.
- Let the kids create their own S’mores to go with their campfire using this craft stick S’mores craft.
- Can’t have a real campfire? Go “camping” in the living room. Everyone can even create their own glowing campfires, using battery-operated tea lights.
We love campfire crafts around here! Be sure to check out this campfire felt pretend play set, campfire watercolor art or 20+ campfire craft ideas too!
Enter your name and email below to get an instant download of the files! You are then registered for my weekly email Newsletter that is full of fun recipes, easy crafts, and free printables.
File Usage
- All digital files on Homemade Heather are for personal use only.
- Please direct others to the original website link when sharing.
- Digital reselling, resharing, or distribution is prohibited and NOT allowed.
Create this quick and easy Dollar Store Craft Stick Campfire with the kiddos to not only promote learning skills, but also to spark conversations about camping, and fire safety. Find even more easy camping crafts and activity printables on the blog. Happy crafting!

If you love this campfire summer craft, please give it a five star review and share it on Facebook or Pinterest.
Campfire Summer Craft
Materials
- Craft Sticks Jumbo
- Cardstock – red orange, yellow & pink
- Wiggle Eyes
- Acrylic Craft Paint – brown & tan
- Paintbrush
- Glue Gun and Glue Sticks
- Scissors
- Pencil
- Washable Marker Black
- Campfire Pattern – below
Instructions
- 1.Gather all supplies. Using scissors, cut both rounded ends from one jumbo craft stick. Cut one rounded end from two jumbo craft sticks.
- 2. Basecoat the three trimmed jumbo craft sticks with dark brown acrylic craft paint. These will become the campfire logs. Let dry, and apply a second coat, if necessary.
- 3. Paint circles with tan acrylic craft paint on the remaining two rounded ends of the two jumbo craft sticks. Let dry, and apply a second coat, if necessary. You can use washable markers, crayon, or even colored pencil to color the jumbo craft sticks.
- 4. Using a washable black or brown marker, draw random lines on the logs to look like tree bark. On the ends of the logs, draw a spiral circle to look like the tree rings.
- 5. Stack the three craft stick logs on top of each other in a criss cross pattern and secure with a glue gun and glue sticks.
- 6. Download, print, and cut out the CRAFT STICK CAMPFIRE PATTERNS. Trace the campfire template pieces onto the cardstock with a pencil or marker. Trace the largest flame on red cardstock, the middle flame onto orange cardstock, and trace the smallest flame onto yellow cardstock.
- 7. Cut all three of the flame shapes out of the cardstock with scissors.
- 8. Layer the campfire flames on top of each other from largest in the back to smallest in the front. Secure each of the three layers together with a glue stick.
- 9. Flip the campfire logs over and attach the flames to the top edge using a glue gun and hot glue. You can use liquid craft glue for this project, but you will have to wait for it to dry.
- 10. Trace the cheek patterns onto pink cardstock using a pencil or marker, and then cut out with scissors.
- 11. Secure the cheeks on either side of the flame with the glue stick. Attach two large wiggle eyes to the campfire flame using a glue gun.
- 12. To finish, draw a smile on the campfire flame’s face from cheek to cheek with a washable black marker.
