DIY Family Beetlejuice Costume Tutorial
Create a spooktacular DIY family Beetlejuice costume with these step-by-step tutorials! Get ready for Halloween fun with iconic looks.

This DIY Family Beetlejuice Costume is so fun for Halloween! Follow the step-by-step instructions to make an epic Beetlejuice costume this year.
Too busy to make this right away? Pin it for later! Pin this post to your favorite board on Pinterest and it will be there when you’re ready!

Every year my kids challenge me to create unique DIY costumes and this year was no exception! In the past we’ve made a Plague Doctor, Functioning Demogorgon Mask, Beeker Costume, Mario & Luigi Go Kart Costumes and a whole family of Angry Bird Costumes!
When planning for Halloween we love to binge watch our favorite, cult classic spooky movies. Beetlejuice is, of course, at the top of the list! It rivals only Hocus Pocus in our books.

Check out these detailed instructions for our Adam and Barbara Maitland Costumes – it was too much to put all of these costumes into one blog post! And we added “Bob” the Shrunken Head Guy & the Sandworm Costume – they turned out awesome too.
Beetlejuice coles notes
- Beetlejuice is a 1988 dark comedy directed by Tim Burton and produced by Warner Bros.
- The Maitlands are a married couple that suddenly pass away and are trapped in their house.
- A new family moves in and the couple tries desperately to scare them off.
- They transform themselves with these scary faces but still have no luck.
- Finally, they enlist in the aide of a poltergeist named Betelgeuse, played by Michael Keaton.
- Drama ensues, “Beetlejuice” is banished and the Maitlands and family decide to live together peacefully.

I have detailed every step of how to create these epic Beetlejuice costumes. They are easy to create with the step-by-step tutorial, promise!

This post contains affiliate links.
DIY Family Beetlejuice Costumes
- Small skull form (4-6″ big)
- Small black wig
- Scissors
- Air dry clay
- Clay shaping tool
- 1″ Styrofoam balls
- Acrylic paint
- Paintbrush
- Mod podge
- Twine
- Thin black fabric
- Two PVC poles about 3′ and 2′ in length
- Two large sponges or foam blocks
- XL tan shirt
- Hat
- Viking helmet
- Black felt material
- Silk fall leaves
- 20-40 feathers
- Raffia material
- Hot glue gun
- Hot glue
- Masking tape
- Tan pants
- Tan top
- Skull mask
- Skull necklace & bracelet
I found most of the craft supplies at our local Dollarama store but have linked similar materials on Amazon.

I have included photos along the way but if you have any questions at all be sure to drop me a message.
Shrunken Head Costume
- Start with a small skull base – this will become the shrunken head!

2. Cover the skull in strips of masking tape to smooth out some of the features.

3. Use air dry clay to shape the features of the head.

4. Make the eyebrows larger, the nose more pronounced, add forehead rolls and holes around the mouth. Use a clay shaping tool to score lines into the face and allow to dry completely.

5. Paint the head with a variety of tones of brown acrylic paint, from light on the nose to dark in the eye sockets.
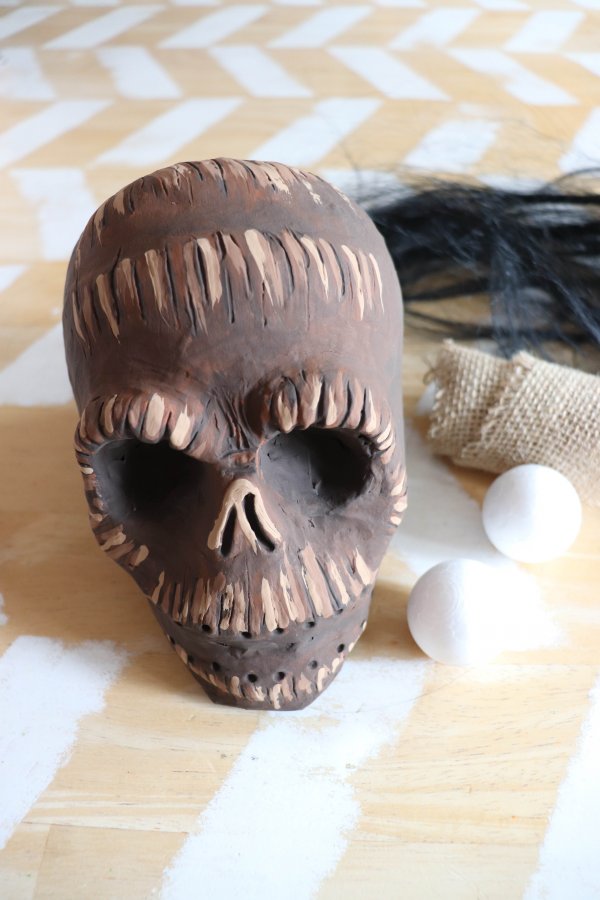
6. Next gather supplies to assemble the head.
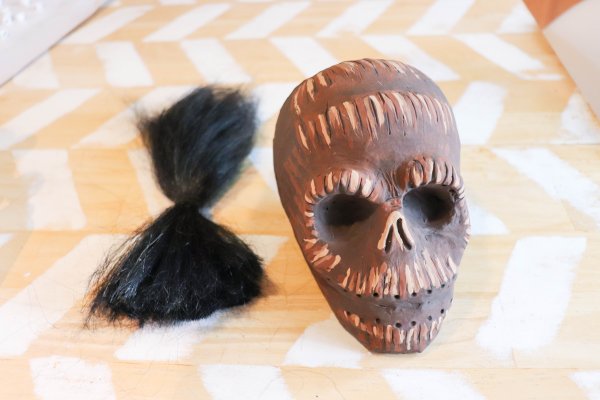
7. Cut a swath of black hair about 10 inches long and tie it in the center to form a pony tail. Glue this to the top of the head with hot glue.

8. Trim off about 1/3 of the styrofoam from the back of two styrofoam balls and glue them into the eye sockets.

9. Cut nine piece of twine 1.5 ” long and glue to the mouth in a criss cross manner.
Finish the eyeballs

10. Paint small pupils and veins onto the eyes using acrylic paint.

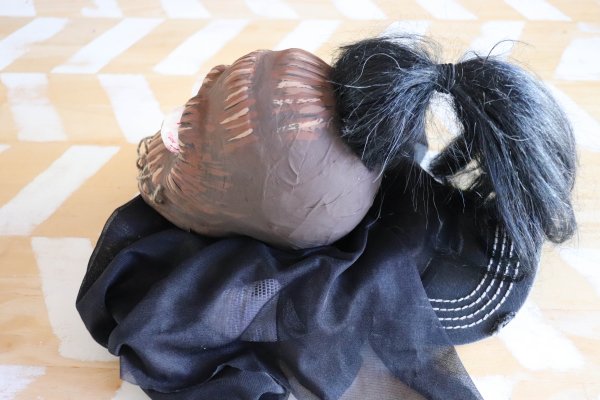
11. Glue the head and black fabric to the top of a hat. Tip: be sure to use enough see through fabric to drape over the face and neck.

12. Now create large shoulders to fit into the xl shirt. We used two pieces of pipe connected with a “t” and two large yoga blocks to create shoulders. You could also use pool noodles and large sponges.

13. Finally, place the hat on your head, tuck the pvc shoulders into a belt and cover it all with the xl shirt.
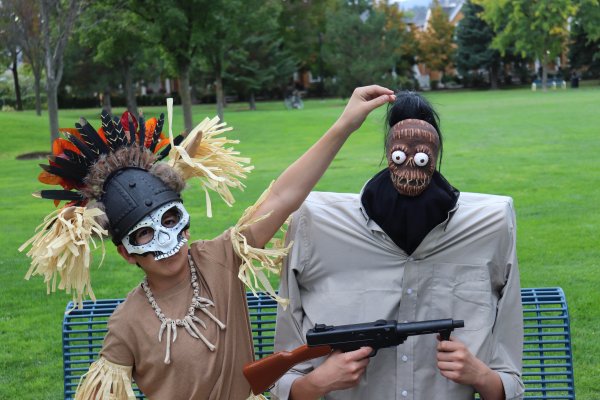
The witch doctor and shrunken head man make the perfect pair.
Witch Doctor Costume

- Start by painting the viking hat black and tan.

2. Add bits of raffia to the horns with hot glue. We used raffia from an old scarecrow costume!

3. Glue fall leaves with long stems to the top of the helmet.

4. Glue feathers onto an 8″ length of felt material.
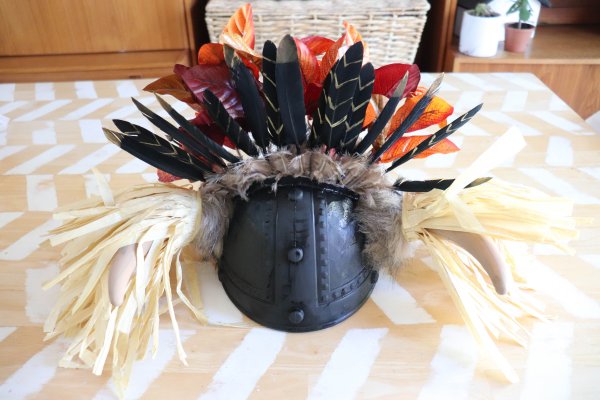
5. Glue the feathers to the top of the hat.
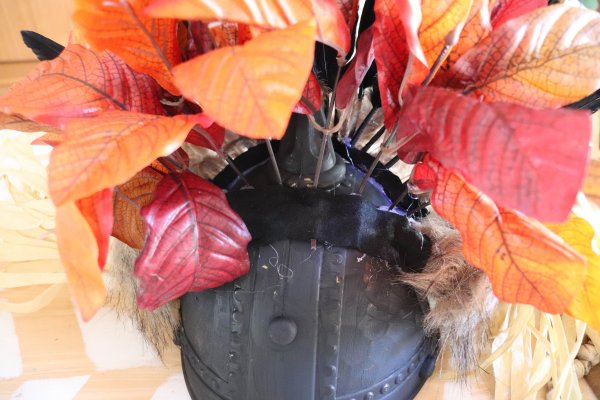
6. Be sure to reinforce the leaves with a strip of felt and hot glue if needed.

7. Finish the witch doctor hat with a coat of mod podge if desired.

8. Finally pair the hat with tan clothing, a raffia skirt, skull mask and skull accessories for a complete look.

Complete witch doctor!

Here are the boys costumes! We hope to have a few more (Lydia and a dead Football Player) in time for trick or treating this Halloween!

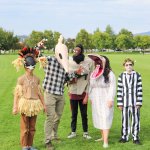
I love how the complete family Beetlejuice costume looks!
DIY Adam & Barbara Maitland Costumes

We absolutely love how these DIY masks turned out and cannot wait to become Adam & Barbara Maitland this Halloween!

Adam Maitland in all of his eye finger glory!

Barbara Maitland is eye popping!

Our DIY Beetlejuice Costumes!

Cam and Isaiah as Beetlejuice and the Witch Doctor.
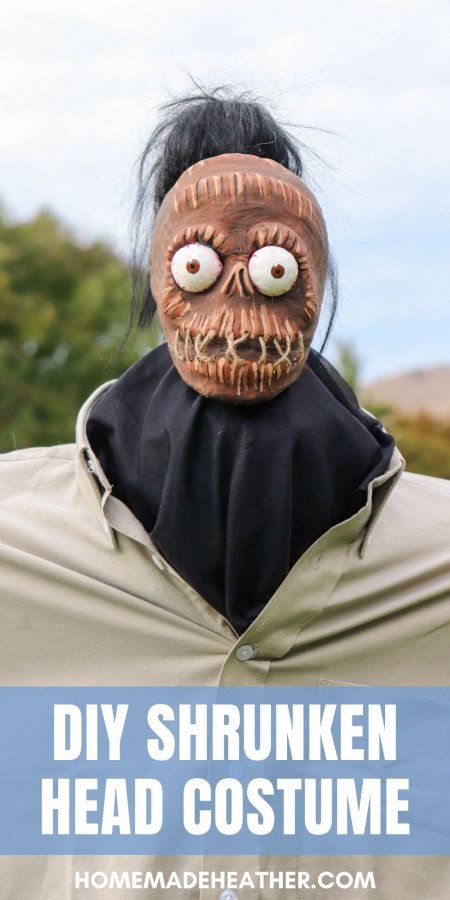
DIY Shrunken Head Costume
More of our crafting essentials
- We love using these Apple Barrel Acrylic Paints to add bright color to all of our projects.
- These paint brushes are ideal for most craft surfaces and a great price!
- This art supplies kit is our favorite because it has everything we needed to get started.
- This rolling storage cart helps to keep our craft supplies organized.
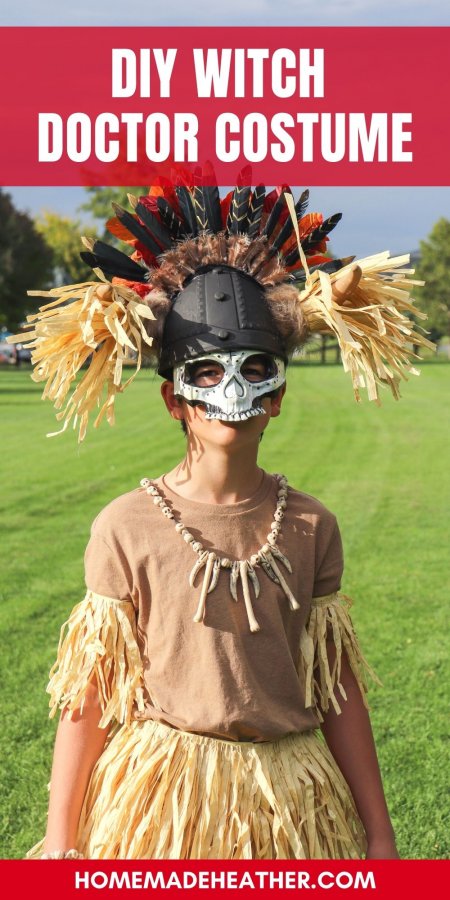
DIY Witch Doctor Costume
If you love this DIY Family Beetlejuice Costume, please help us by sharing it on Facebook or Pinterest so that others can enjoy it too!
DIY FAMILY BEETLEJUICE COSTUME TUTORIAL
Materials
- Small skull form 4-6″ big
- Small black wig
- Scissors
- Air dry clay
- Clay shaping tool
- 1 ″ Styrofoam balls
- Acrylic paint
- Paintbrush
- Mod podge
- Twine
- Thin black fabric
- Two PVC poles about 3′ and 2′ in length
- Two large sponges or foam blocks
- XL tan shirt
- Hat
- Viking helmet
- Black felt material
- Silk fall leaves
- 20-40 feathers
- Raffia material
- Hot glue gun
- Hot glue
- Masking tape
- Tan pants
- Tan top
- Skull mask
- Skull necklace & bracelet
Instructions
SHRUNKEN HEAD COSTUME:
- Start with a small skull base – this will become the shrunken head.
- Cover the skull in strips of masking tape to smooth out some of the features
- Use air dry clay to shape the features of the head
- Make the eyebrows larger, the nose more pronounced, add forehead rolls and holes around the mouth. Use a clay shaping tool to score lines into the face and allow to dry completely.
- Paint the head with a variety of tones of brown acrylic paint, from light on the nose to dark in the eye sockets.
- Next gather supplies to assemble the head.
- Cut a swath of black hair about 10 inches long and tie it in the center to form a pony tail. Glue this to the top of the head with hot glue.
- Trim off about 1/3 of the styrofoam from the back of two styrofoam balls and glue them into the eye sockets.
- Cut nine piece of twine 1.5 ” long and glue to the mouth in a criss cross manner.
- Finish the eyeballs
- Paint small pupils and veins onto the eyes using acrylic paint.
- Glue the head and black fabric to the top of a hat. Tip: be sure to use enough see through fabric to drape over the face and neck.
- Now create large shoulders to fit into the xl shirt. We used two pieces of pipe connected with a “t” and two large yoga blocks to create shoulders. You could also use pool noodles and large sponges.
- Finally, place the hat on your head, tuck the pvc shoulders into a belt and cover it all with the xl shirt.
- The witch doctor and shrunken head man make the perfect pair.
Witch Doctor Costume:
- Start by painting the viking hat black and tan.
- Add bits of raffia to the horns with hot glue. We used raffia from an old scarecrow costume!
- Glue fall leaves with long stems to the top of the helmet.
- Glue feathers onto an 8″ length of felt material.
- Glue the feathers to the top of the hat.
- Be sure to reinforce the leaves with a strip of felt and hot glue if needed.
- Finish the witch doctor hat with a coat of mod podge if desired.
- Finally pair the hat with tan clothing, a raffia skirt, skull mask and skull accessories for a complete look.

This is awesome, thank you for sharing!
Thanks so much!