DIY Polymer Clay Mushrooms
Whimsical, colorful, and absolutely no risk of wilting—these DIY polymer clay mushrooms add the perfect pop of charm to your plant pots or fairy garden!

These DIY clay mushrooms are so fun to create and make the cutest little plant accessories that you have ever seen! Check out the full step-by-step photo tutorial below.
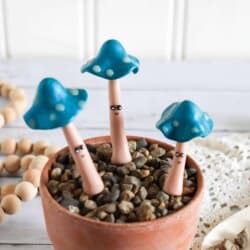
Okay, tell me these aren’t the most ridiculously adorable little things you’ve ever seen? These polymer clay mushrooms have officially stolen my heart—and a corner of my indoor jungle.
They’re fun to make, easy enough for the kids to get in on the action (hello summer boredom buster!), and best of all, they’ll never need watering or sunshine. Total win if your houseplants already live in fear of your forgetfulness.
Too busy to make this right away? Pin it for later! Pin this post to your favorite board on Pinterest and it will be there when you’re ready!

Why You’ll Love This Craft
This easy clay craft is a total crowd-pleaser—great for all ages, wildly customizable, and just the right kind of quirky. Whether you’re sprucing up a potted succulent or decking out a fairy garden, these little mushroom pals make the perfect addition to your space.
Plus, working with polymer clay is super therapeutic—like Play-Doh for grown-ups, but with way better results. Making these miniature mushroom clay sculptures is also a fun way to use up scraps, try different mushroom cap shapes, or even create a gift for a friend.

[mv_video doNotAutoplayNorOptimizePlacement=”false” doNotOptimizePlacement=”false” jsonLd=”true” key=”dbgcbbidct6iklxggnhl” ratio=”16:9″ thumbnail=”https://mediavine-res.cloudinary.com/v1617770404/yrekosbfef55tvvrjvxe.jpg” title=”DIY Clay Mushrooms” volume=”70″]
Be sure to check out a few of my other polymer clay projects, like these darling mini clay succulents, an adorable clay Baby Yoda, and these adorable clay s’mores!

How to Make These Polymer Clay Mushrooms
This post contains affiliate links.
Supplies
- Parchment paper
- Baking sheet
- Polymer clay in tan, blue, white, and black
- Clay cutting and shaping tools
- Toothpicks
- Black Sharpie fine tip marker
- White glue
- White paint
- Mod Podge
- Paint brush

Instructions
1. Begin by forming your polymer clay into soft, malleable balls.

2. Roll the tan clay into 3 cm balls.

3. Form the balls into long cylindrical shapes that taper at the top.

4. Curve the mushroom stems if desired. Create a hole in the base using a toothpick.

5. Roll the blue clay into 4 cm balls. Make a bunch of tiny white clay balls—about ½ cm wide—for your mushroom spots.

6. Press and roll the blue balls into a flat circular shape.

7. Press the tiny white balls into the mushroom caps.

8. Use the end of a stylus or forming tool to press the blue circle into a mushroom cap shape.
9. Roll tiny black balls of clay for eyes.

10. Bake the clay on a tray lined with parchment paper as directed on the package. For me, this was 20 minutes at 220°F.

11. When the clay has cooled, glue the black balls to the stems for eyes.

12. Add mouths to the stems using a black Sharpie marker.

13. Paint white dots onto the back eyes.
Tip: I use a toothpick dipped in white paint to get the tiny white dots.

14. Seal the clay with a layer of Mod Podge.

15. Insert a toothpick into the base to create a plant pick.
16. Gently place or glue the clay mushroom cap onto the top of the stem and add it to your favorite plant pot as a fun accent.

These clay mushrooms are seriously so adorable. They are way easier to create than they look and you can’t kill them like a real plant, so it’s a win/win! This easy craft is a great way to add a touch of whimsy to your garden!

My Essentials for Clay Crafts
- We love using this Sculpey Polymer Oven Bake Clay for all of our projects.
- This clay shaping tool kit is a must-have for clay crafting!
- These paint brushes are ideal for most craft surfaces and a great price!
- This rolling storage cart helps to keep our craft supplies organized.

These cute little guys were actually inspired by mushrooms my grandma made out of oven-fired clay—she’s 95, a talented potter, and one of the most creative people that I know!
Grandma’s clay mushrooms are glazed and grace my outdoor planters. These little polymer clay ones are better suited for inside use.

Tips and Tricks
- You can find all kinds of different colors of clay at Michaels stores.
- Work with a high quality product like Sculpey clay.
- Always knead your clay until it’s warm—it makes shaping smoother and reduces cracking.
- Store unused clay in plastic wrap inside an airtight container to keep it fresh.
- Score where you want two pieces of clay to stick together.
- Shape cutters work best on a flat, solid work surface.
- A craft oven is not needed.
- Bake at low temperatures to allow the clay to set slowly and prevent cracking.

I love that this would be a really easy and fun nature craft to make with the kids! The combination of colors and shapes is endless and it would be neat to see what they come up with.
Instead of using them as plant picks, you could add a jump ring or eye pin to the top of your mushroom and turn it into a keychain or charm.

Frequently Asked Questions
Can I use air dry clay instead of polymer clay?
Yes, air dry clay can work, but it’s less durable and not water-resistant like polymer clay, so it’s best for decorative indoor use.
How do I keep my clay from cracking while baking?
Bake at low temperatures and make sure your shapes are even in thickness. Thicker parts may crack if the outside hardens too fast.
Can you bake polymer clay in a regular oven?
Absolutely! Just make sure you’re using an oven-safe tray and line it with parchment paper. Don’t use the same one you bake cookies on though.
What’s the best clay for this project?
Sculpey polymer clay is a great choice. Not only is it the perfect medium for tiny mushrooms, it is beginner-friendly and comes in tons of colors.
How do I attach the cap to the stem securely?
Use white glue, or bake the cap and stem together if you want a sturdier hold. You can also press a toothpick into the top of the stem before baking for easy assembly.

So there you go, friend! The perfect little polymer clay mushrooms to brighten your plant babies, give your bookshelf a gnome-approved touch, or just make you smile every time you walk by.
Whether you’re creating a whole garden of mini mushrooms or sneaking one into your teen’s cactus planter, this is one easy craft you’ll want to make again and again.
If you love this DIY polymer clay mushroom craft, please help me share it on Facebook and Pinterest so that others can enjoy it too!
DIY Polymer Clay Mushrooms
Materials
- parchment paper
- baking sheet
- polymer clay in tan blue, white and black
- clay cutting and shaping tools
- toothpicks
- black sharpie fine tip marker
- white glue
- white paint
- mod podge
- paint brush
Instructions
- Begin by forming the clay into soft, malleable balls.
- Roll the tan clay into 3 cm balls.
- Form the balls into long cylindrical shapes that are tapered at the top.
- Curve the stems if desired. Create a hole in the base using a toothpick.
- Roll the blue clay into balls that are about 4cm thick. Roll many tiny white balls that are about 1/2 cm in diameter.
- Press and roll the blue balls into a flat circular shape.
- Press the tiny white balls into the mushroom caps.
- Use the end of a stylus to press the blue circle into a mushroom cap shape.
- Roll tiny black balls of clay for eyes.
- Bake the clay as directed on the package. For me this was 20 minutes at 220 degrees.
- When the clay has cooled, glue the black balls to the stems for eyes.
- Add mouths to the stems using a black sharpie marker.
- Paint white dots onto the back eyes. Tip: I use a toothpick dipped in paint to get the tiny white dots.
- Seal the clay with mod podge.
- Insert a toothpick into the base to create a plant pick.
- Balance the mushroom cap on the stem and place it in your favorite plant pot as a fun accent. Tip: you may also glue the cap to the stem if desired.

More clay craft projects:
[mv_create key=”279″ layout=”hero” thumbnail=”false” title=”Clay Crafts” type=”list”]
