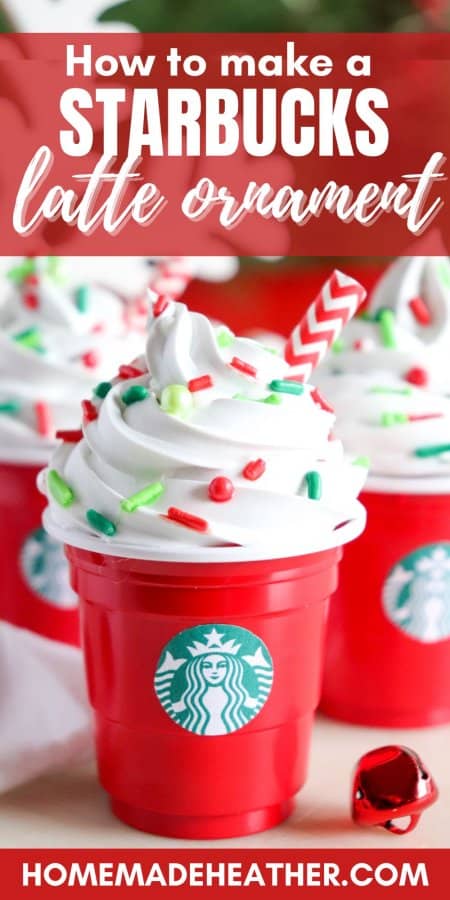
DIY Starbucks Latte Ornament Tutorial
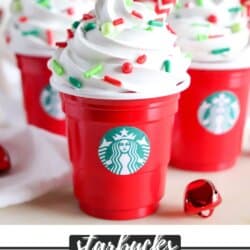
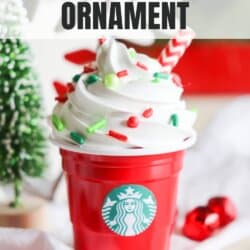
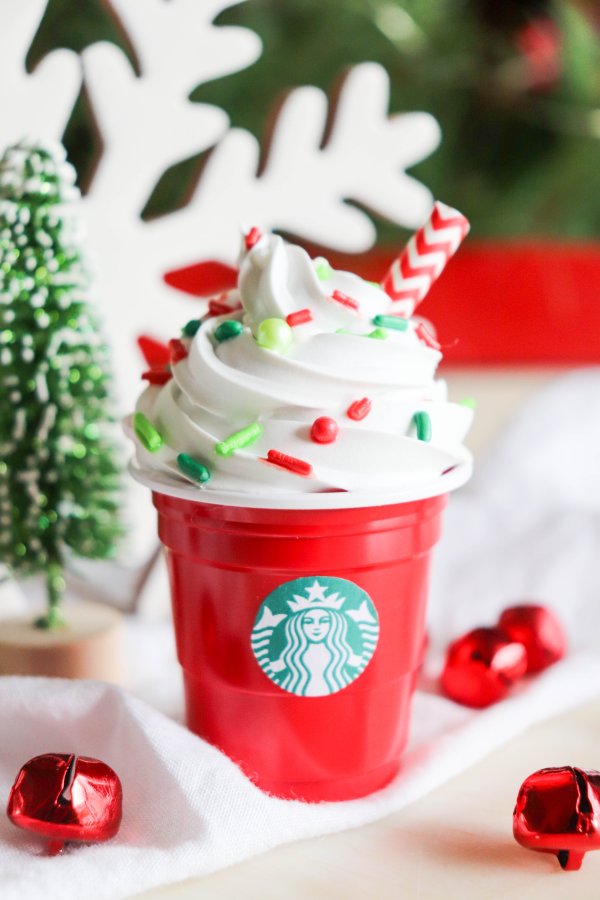
DIY Starbucks latte ornaments – sip, craft, and decorate your tree in style with these darling mini holiday cups topped with whipped cream and sprinkles!
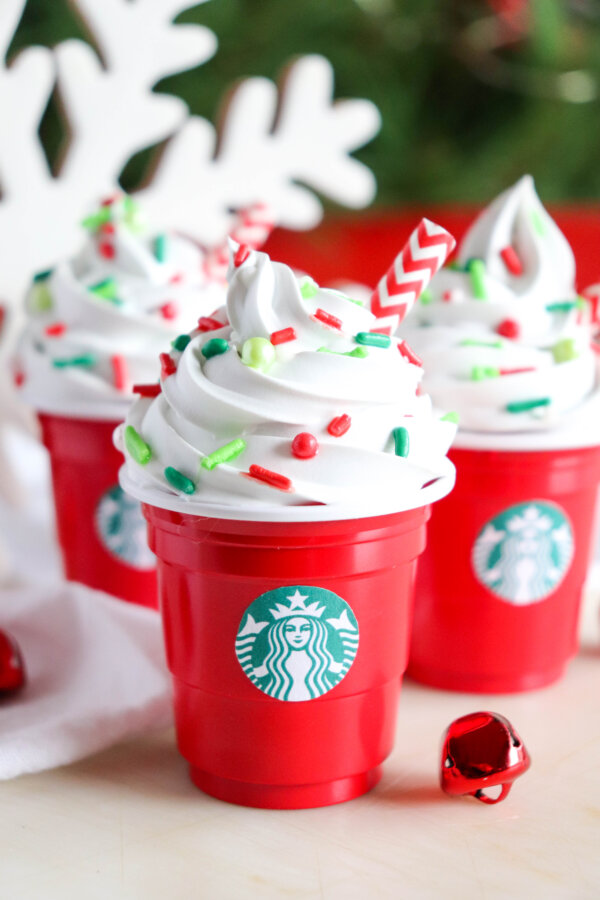
Handmade ornaments, like this DIY Starbucks latte, make great gifts for the holiday season! It’s a simple, creative craft for anyone with a love for Starbucks.
I love the classic holiday color combination of red and green in these mini lattes and the Christmas sprinkles are the perfect finishing touch. You’ll want to make these clay Starbucks cup ornaments too!
You know how much I love my Starbucks! So I figured, why not bring some of that love for my favorite coffee shop into my holiday decor?
These DIY Starbucks latte ornaments are easy to make, creative, and totally adorable. The mini Starbucks cups are topped with “whipped cream,” festive holiday sprinkles, and the cutest little straw.
If your tree needs a little extra cheer this year, incorporate your favorite holiday beverage with these cute ornaments.

Too busy to make this right away? Pin it for later! Pin this post to your favorite board on Pinterest and it will be there when you’re ready!
Why You’ll Love This DIY
This is one of those holiday crafts that’s simple enough to make with the kids, but cute enough to impress your friends. They bring instant holiday sparkle to your tree, double as a unique way to wrap presents, and pair beautifully with other handmade ornaments.
If you’re a huge fan of Starbucks like I am, you’ll love the chance to combine your love of holiday drinks with a festive DIY project.
This year, I decided to host the Twelve Days of Christmas Crafts on Instagram and we had so much fun! We’ve made a ton of crafts to go along with my DIY tree collar and holiday ribbon picks!

Be sure to check out this wine cork garland, sweater ornament tutorial, clay farmhouse ornaments, and wood plank tree signs too!

As a huge fan of Starbucks, these latte ornaments have quickly become my favorite homemade ones so far! They’re the perfect mix of DIY decor and a nod to that daily caffeine fix we all rely on.
Plus, they make great gifts — especially when paired with a Starbucks gift card. Can you imagine a friend opening a present topped with one of these as a gift tag? Darling!
If you think these are cute, then you need to check out these Starbucks hot cocoa ornaments too. The spackle in that post is a bit lighter than the one used here and we use puffy paint to add chocolate “drizzle” to the whipped cream!
How to Make These DIY Ornaments

This post contains affiliate links.
Supplies
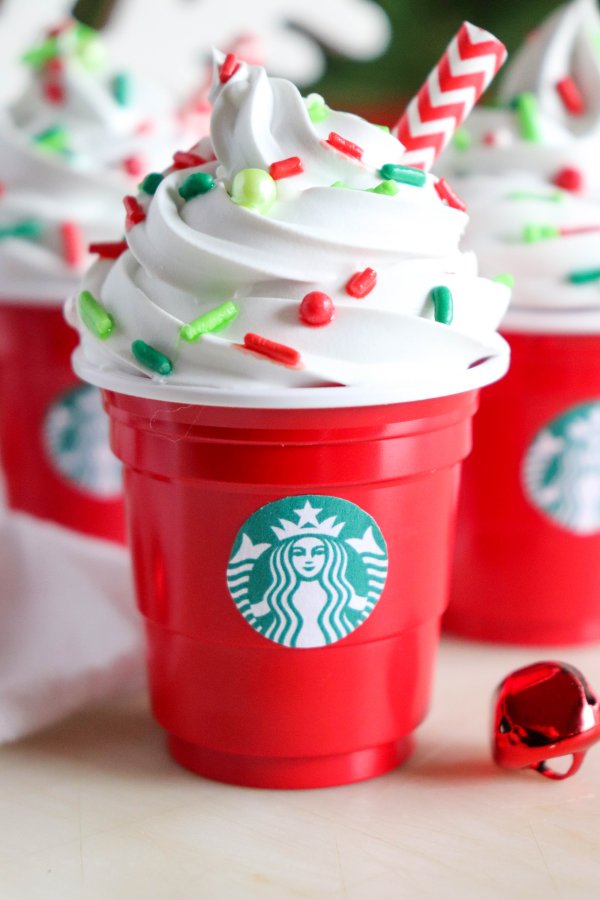
- Mini red solo cups – These 2-oz cups are the base of your latte and totally adorable.
- 1″ Styrofoam balls – They fill your cup without adding extra weight.
- White caulking – For that fluffy faux whipped cream swirl on top.
- Piping bag and 1M icing tip – Makes the “frosting” look just like the real deal.
- Festive paper straw – Because every latte needs a pop of striped cuteness.
- Holiday sprinkles – They add a little extra sparkle and color.
- Hot glue gun – Your best friend when making any holiday crafts.
- Baker’s twine – For that perfect little loop to hang your ornament.
- Starbucks mini logos – For the perfect finishing touch.

Instructions
1. Glue two Styrofoam balls together using hot glue.

2. Glue the two Styrofoam balls into the base of the mini solo cup.

3. Fill a piping bag with approximately 1/4 cup of white caulk. Cut the tip from the bag and attach the 1M decorative tip.

4. Use the caulk to frost the top of the Styrofoam ball like a cupcake.

5. Cut a 1″ length from a straw and place it into the frosting. Dust the top of the cup with festive sprinkles.
Tip: Tiny beads or sparkles work great too! The color from these food grade sprinkles tends to bleed a little into the spackle.

6. Glue a Starbucks logo to the front of the cup for that authentic touch (optional). I printed off these mini logos using my printer at home (free downloadable file can be found at the bottom of this post – for personal use only).
7. Create a loop of baker’s twine and glue it to the cup for hanging.
Tip: The best spot (so that the cup doesn’t tip too much) seems to be gluing the loop inside of the straw when the caulk is completely dry.
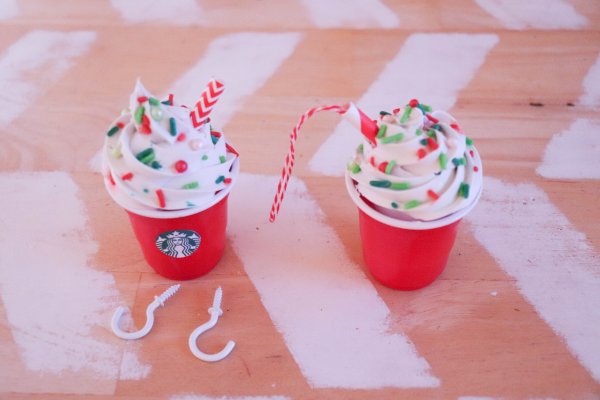
You could also use a picture hanger hook fastened to the top of the spackle when dry (as shown above).

Now step back and admire your mini masterpiece. Seriously, how darling are these Starbucks Christmas ornaments?!
I plan to hang them on the Christmas tree and use them as gift tags to embellish gifts!

Have you made a Christmas craft like this? More of our favorite DIY Christmas ornaments include: this reindeer ornament, these DIY wood slice ornaments, and this dried orange garland.
Tips and Tricks
- Let the caulk fully dry before adding the twine so it doesn’t sink into the “whipped cream.”
- Use glitter or beads instead of sprinkles if you want ornaments that last year after year.
- Keep your craft surfaces protected with parchment paper for easy cleanup.
- Mixing an assortment of different straw patterns gives your ornaments a fun variety of colors.
- Make a batch of these alongside your kids’ holiday ribbon picks for double the fun.

This post contains affiliate links.
Crafting Essentials for Holiday Crafts
- We love using these Apple Barrel acrylic paints to add bright color to all of our projects.
- These paint brushes are ideal for most craft surfaces and a great price!
- This art supplies kit is our favorite because it has everything we needed to get started.
- This rolling storage cart helps to keep our craft supplies organized.
Frequently Asked Questions
How do you make a DIY Starbucks latte ornament look realistic?
The trick is in the piping bag and decorative tip — it makes the white caulking look just like fluffy whipped cream. Adding a Starbucks logo to the front of the cup is the finishing touch.
Can you use real whipped cream or food sprinkles for Starbucks ornaments?
Stick to faux options like caulk and beads because real whipped cream and edible holiday sprinkles won’t last through the holiday season.
What makes Starbucks ornaments such great gifts?
They’re adorable, customizable, and can be paired with Starbucks gift cards or used as gift tags for a little extra holiday cheer.
How do you hang a Starbucks ornament so it doesn’t tip?
Glue the loop of baker’s twine into the straw after the caulk dries, or use a picture hanger hook secured into the top of the spackle.
Can I make other DIY Starbucks crafts to match these ornaments?
Yes! Try Starbucks hot cocoa ornaments, clay Starbucks cup ornaments, or even matching sweater ornaments and wine cork garland for a whole themed tree.
Enter your name and email below to get an instant download of the files! You are then registered for my weekly email Newsletter that is full of fun recipes, easy crafts, and free printables.
File Usage
- All digital files on Homemade Heather are for personal use only.
- Please direct others to the original website link when sharing.
- Digital reselling, resharing, or distribution is prohibited and NOT allowed.
If you love this DIY Starbucks latte ornament, please give it a five-star review and help me share it on Facebook and Pinterest so that others can enjoy it too!

DIY STARBUCKS LATTE ORNAMENT TUTORIAL
Materials
- Mini red solo cups
- 1 ″ Styrofoam balls
- White caulking
- Piping bag and 1M icing tip
- Festive paper straw
- Holiday sprinkles
- Hot glue gun
- Baker’s twine
Instructions
- Glue two Styrofoam balls together using the hot glue.
- Glue the two Styrofoam balls into the base of the mini solo cup.
- Fill a piping bag with approximately 1/4 cup of white caulk. Cut the tip from the bag and attach the 1M decorative tip.
- Use the caulk to frost the top of the Styrofoam ball like a cupcake.
- Cut a 1″ length from a straw and place it into the frosting. Dust the top of the cup with festive sprinkles.
- Glue a Starbucks logo to the front of the cup (optional). I printed off these mini logos using my printer at home (free downloadable file can be found at the bottom of this post – for personal use only).
- Hot glue a loop of baker's twine to the cup for hanging. The best spot (so that the cup doesn’t tip too much) seems to be gluing the loop inside of the straw when the caulk is completely dry.
Video

I love your Starbucks minis, did you use vinyl or sticker paper for your logo’s ?
Aww thank you! I used printer paper but sticker paper would be great too!
What size are the logo circles? Did you just print a bunch on printer paper and then cut them out? Or did you print on paper that had pre-cut circles?
They are about half an inch, just printed on regular paper and cut out with scissors :)
What size are the cups? I got 2 oz but the 1 inch balls are too small. Is it the 2 inch balls?
These are 1 oz cups :)
These are super cute!!! I am making them!! How do you get the colors of the sprinkles from running?
Yay! Have so much fun! My sprinkles only ran a tiny bit. You could try spraying them with a clear sealant if you want or use glitter instead :)
I cannot find 1oz red cups to save my life. Where did you get them from?
The 2oz ones work too! https://amzn.to/490YPKQ
Thanks for sharing the mini Star Bucks cup. You stated that the printable of logo was at the end of the post, but I couldn’t find it anywhere. Can you please send that printable or the location of where you found it. I can’t wait to see more.
There is a turquoise form at the bottom of the post that says enter your email to get the printable – then its sent to your inbox :)
Hi, love this! Can you email me the Starbucks template please? I am not seeing it at the bottom of the post.
If you enter your email in the form in the blog post, they are automatically sent to you.
I love this and I bought everything to try this tonight, but I was trying to find the printable logo and I’m not seeing it.. Is there somewhere else on your page it’s on?
Leave your email in the form above the words “file usage” an it will be sent to you :)
You listed 2oz cups in your list of supplies but replied to someone that the cups you used were 1oz. A girl tried using the 2 oz cups with 1 in balls and said they were too small. So should we use 1.5 in balls with 2oz cups?
Oh gosh! Sorry for the confusion – yes, they are 2oz red solo cups. I used two 1″ balls, stacked inside of the cups and filled the empty space with chalk. 1.5″ balls might work?