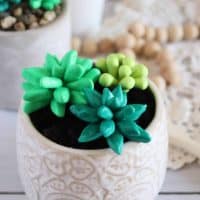
DIY Polymer Clay Succulent Plants
Make adorable DIY clay succulent plants with polymer clay! These cute mini planters are easy, colorful, fun to customize, and make great gifts.

These DIY clay succulent plants are super easy to make and create the cutest planters you’ve ever seen! Follow this step-by-step visual tutorial to make your own.
Seriously, how darling are these clay succulents?! So cute!
Too busy to make this right away? Pin it for later! Pin this post to your favorite board on Pinterest and it will be there when you’re ready!

Be sure to check out a few of my other polymer clay projects, like these cute vegetable garden markers, clay mushrooms, sloth magnets, and these adorable clay s’mores!

This clay succulent craft is seriously the best. An easy craft like this is a great way to add a pop of color and whimsy to your space.

This post contains affiliate links.
Supplies That You Will Need
- Parchment paper
- Baking sheet
- Polymer clay in blue green, dark green, and light green
- Clay cutting and shaping tools
- Toothpicks
- Mod Podge
- Paintbrush
- Plant pot
- Potting soil or small rocks

How to Make Clay Succulent Plants
Instructions
1. Begin by forming the clay into a soft, malleable ball.

2. Roll 1 cm clay balls in each of the three green colors.

3. Form the balls into three different shapes to create three different kinds of succulent plants.
4. Leaves, cones, and teardrops.
Make a Plant With the Leaves

5. Press 6-8 of the leaves together at one end to form a flower shape.

6. Layer 4-6 of the leaves on top of that.

7. Finish with 3 more leaves and plant one is complete.

Make a Plant With the Cones

8. Flatten a ball into a flat disk and press the end of the cone shapes around the edge of the disk.

9. Bring the cones up to the center and press together to form another plant.

Make a Plant With the Teardrops

10. Press four of the teardrops together at the rounded base.

11. Layer the teardrops alternatingly to create another plant.

12. Repeat these steps to make many plants of varying sizes and shapes.
13. Poke a hole in the underside of each clay plant for a toothpick.
14. Bake the clay as directed in the oven. For me, that was 25 minutes at 200°F.

15. Once the clay has cooled, seal with Mod Podge.
16. Using a toothpick, place each plant into the soil or rocks of the plant pot.

Super cute and easy right?! And they can totally be made and personalized in a hundred different ways — change up the colors and shapes for a wide variety of little clay succulents.
Check out this mini succulent tutorial to learn how to make individual plants in their own adorable pots.

My Essentials for Clay Crafts
- We love using this Sculpey polymer oven-bake clay for all of our projects.
- This clay shaping tool kit is a must-have for clay crafting!
- These paintbrushes are ideal for most craft surfaces and a great price!
- This rolling storage cart helps to keep our craft supplies organized.

This pretty turquoise blue/green color was my favorite. If you make these, I would love to see them, so please share your photos!

Polymer Clay Crafting Tips
- Work with a high quality product like Sculpey clay.
- Use plastic wrap in an airtight container to store clay.
- Score where you want two pieces of clay to stick together.
- Shape cutters work best on a flat, solid work surface.
- A craft oven is not needed.
- Bake at low temperatures to allow the clay to set slowly and prevent cracking.
- You can find clay of all kinds of different colors at Michaels stores.
Frequently Asked Questions
Can you make succulents out of polymer clay?
Yes! Polymer clay is perfect for making faux succulents because it’s easy to shape, holds fine details beautifully, and hardens in the oven for durable decorations.
What temperature do you bake polymer clay succulents at?
Most polymer clay brands bake at low temperatures between 200°F–275°F depending on the package directions. Baking slowly helps prevent cracking and keeps the colors vibrant.
How do you keep polymer clay from cracking?
Condition the clay well before shaping, avoid making pieces too thick, and bake at the recommended temperature. Letting the clay cool gradually also helps prevent cracks.
Do clay succulents need sealing?
Sealing is optional, but adding a coat of Mod Podge or another sealer can give your clay succulents extra protection and a pretty finished look.
What can you use instead of soil in faux plant crafts?
Small rocks, pebbles, sand, beads, or decorative moss all work great for displaying faux succulents.

If you love these DIY clay succulent plants, please help me share them on Facebook and Pinterest so that others can enjoy them too!
DIY Polymer Clay Succulent Plants
Materials
- Parchment paper
- Baking sheet
- Polymer clay blue green, dark green, and light green
- Clay cutting and shaping tools
- Toothpicks
- Mod Podge
- Paintbrush
- Plant pot
- Potting soil or small rocks
Instructions
- Begin by forming the clay into a soft, malleable ball.
- Roll 1 cm clay balls in each of the three green colors.
- Form the balls into three different shapes to create three different kinds of succulent plants.
- Leaves, cones, and teardrops.
- Press 6-8 of the leaves together at one end to form a flower shape.
- Layer 4-6 of the leaves on top of that.
- Finish with 3 more leaves and plant one is complete.
- Flatten a ball into a flat disk and press the end of the cone shapes around the edge of the disk.
- Bring the cones up to the center and press together to form another plant.
- Press four of the teardrops together at the rounded base.
- Layer the teardrops alternatingly to create another plant.
- Repeat these steps to make many plants of varying sizes and shapes.
- Poke a hole in the underside of each clay plant for a toothpick.
- Bake the clay as directed in the oven. For me, that was 25 minutes at 200°F.
- Once the clay has cooled, seal with Mod Podge.
- Using a toothpick, place each plant into the soil or rocks of the plant pot.
Video
Notes
- Work with a high quality product like Sculpey clay.
- Use plastic wrap in an airtight container to store clay.
- Score where you want two pieces of clay to stick together.
- Shape cutters work best on a flat, solid work surface.
- A craft oven is not needed.
- Bake at low temperatures to allow the clay to set slowly and prevent cracking.
- You can find clay of all kinds of different colors at Michaels stores.
