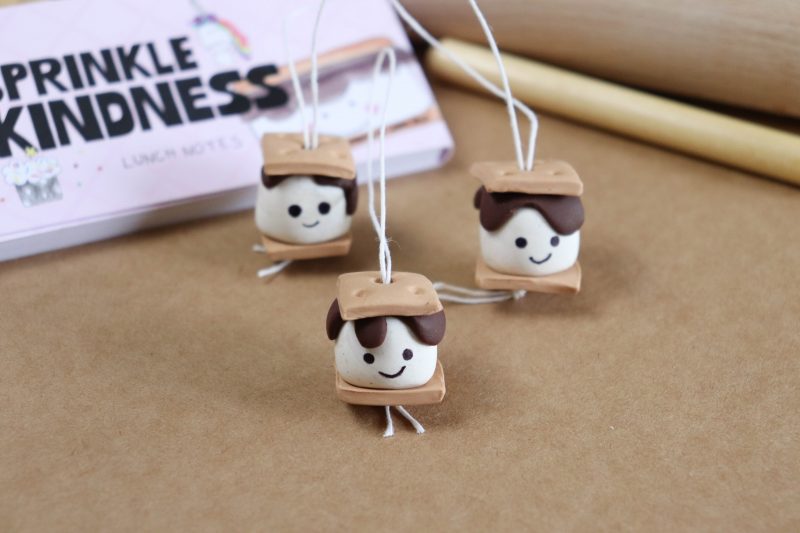
Smores Polymer Clay Craft
This darling smores craft is easy to make with the kids and only requires a bit of polymer clay, twine and a sharpie marker. Create a cute smores ornament with this step-by-step tutorial!
Too busy to make this right away? Pin it for later! Pin this post to your favorite board on Pinterest and it will be there when you’re ready!
How freaking adorable are these little smores?! And you guys, it is SO EASY to create, seriously!
We have been obsessed with clay crafts recently! Be sure to check out this DIY Clay Plant Pot or these Polymer Clay Snowflake Ornaments too.
It’s camping season around here so when we decided to get creative recently, these smores came to mind! We love smores as showcased in this smores cookie recipe, this Smore’s tshirt tutorial and these cinnamon bun smores.
My friend Laura, at Me and My Inklings, has the cutest line of Kindness lunch notes, postcards and even a book that would make the best addition to this craft and the perfect gift! Her little smore doodle inspired our design.How darling is this simple project?! This easy craft is a great way to get creative and crafty!
How to make this smores craft:
This post contains affiliate links.
Supplies that you will need:
- rolling pin
- parchment paper
- white polymer clay
- tan polymer clay
- brown polymer clay
- cutting and piercing tool
- black sharpie fine tip marker
- twine
- Roll the white clay into balls about 3/4″ thick. Press into a cylinder, marshmallow shape.
2. Roll the tan clay to about 1/4″ thick. Cut into 1/2″ squares and mark with four round indents to create graham crackers.
3. Form a 1/4″ ball of brown clay into melted chocolate. Roll the clay 1/8″ flat and use the shaping tool to mold the clay.
4. Layer the brown clay on the top of a marshmallow, making it look like its dripping down the sides.
5. Place a tan square on the top and bottom of the marshmallow.
6. Use a piercing tool to poke a hole through the center of the clay smore.
7. Bake the clay as directed in the oven. For me this was 20 minutes at 200 degrees.
8. Once the clay has cooled, sketch a little face onto it using a fine tipped sharpie. Thread a loop of twine through the hole in the center and you are done!
Didn’t these smores turn out darling?!
My essentials for clay crafts:
- We love using this Sculpey Polymer Oven Bake Clay for all of our projects.
- This clay shaping tool kit is a must have for clay crafting!
- These paint brushes are ideal for most craft surfaces and a great price!
- This rolling storage cart helps to keep our craft supplies organized.
I love, love, love all of the little details on these ornaments! And they were so simple to create! A true win, win in our home.
Polymer clay crafting tips:
- Work with a high quality product like sculpey clay.
- Use plastic wrap in an air tight container to store clay.
- Score where you want two pieces of clay to stick together.
- Shape cutters work best on a flat, solid work surface.
- A craft oven is not needed.
- Bake at low temperatures to allow the clay to set slowly and prevent cracking.
- You can find clay of all kinds of different colors at Michaels stores.
Be sure to check out Laura’s Kindness Collection and tell me which one is your favorite! We can’t wait to deliver these cute smore ornaments as random acts of kindness to friends.
If you love this smores craft, please give it a five star review and help me share it on Facebook and Pinterest!
Smores Polymer Clay Craft
Materials
- rolling pin
- parchment paper
- white polymer clay
- tan polymer clay
- brown polymer clay
- cutting and piercing tool
- black sharpie fine tip marker
- twine
Instructions
- 1. Roll the white clay into balls about 3/4″ thick. Press into a cylinder, marshmallow shape.
- 4. Layer the brown clay on the top of a marshmallow, making it look like its dripping down the sides.
- 7. Bake the clay as directed in the oven. For me this was 20 minutes at 200 degrees.
Video
More clay craft projects:


This is so cute! I’m planning to make this with my class. Is there a trick to How the string will hold up the ornament? It looks so perfect! I’m just struggling to understand how the string won’t come out of the bottom.
Awww yay! There is a big knot in the string under the smore that keeps it from sliding through.